Easy Easter Basket Bundt Cake – Spring Dessert
Easter Basket Bundt Cake Recipe (Easy Spring Dessert!) is about to become your new favorite springtime treat. Imagin extracte a cake that not only tastes like sunshine and joy but also looks like it just tumbled out of an Easter basket itself! This delightful creation is perfect for any Easter gathering, from a casual family brunch to a more festive celebration. What’s not to love? It’s incredibly easy to make, meaning less time in the kitchen and more time enjoying the company of loved ones. The beautiful bundt shape lends itself perfectly to decorating, allowing your inner artist to shine. We’ll transform a simple bundt cake into a whimsical Easter masterpiece, adorned with all the hallmarks of spring. Get ready to impress everyone with this show-stopping, yet surprisingly simple, Easter Basket Bundt Cake Recipe!
Easter Basket Bundt Cake Recipe (Easy Spring Dessert!)
Easter is a time for joy, family, and of course, delicious treats! This year, why not surprise your loved ones with a show-stopping Easter Basket Bundt Cake? It’s not only incredibly easy to make, but it also looks absolutely stunning, making it the perfect centerpiece for your Easter brunch or dessert table. Imagin extracte a moist, tender bundt cake sculpted to resemble a whimsical Easter basket, complete with a delicate handle and adorned with colorful candy eggs. This recipe is designed for simplicity, ensuring even novice bakers can achieve impressive results. We’ll walk you through each step, offering helpful tips along the way, so you can create a memorable dessert that tastes as good as it looks. Get ready to bake some Easter magic!
Ingredients:
Creating Your Easter Masterpiece
This recipe breaks down the process into simple, manageable steps. We’ll focus on creating the perfect cake batter, shaping our basket, and then bringin extractg it to life with festive decorations.
Baking the Bundt Cake
The foundation of our Easter Basket Bundt Cake is a perfectly baked bundt cake. We’re starting with a box mix for ease and consistency, but the additions of sour cream and extra vanilla extract will elevate it to homemade deliciousness.
Preheat and Prepare: Begin extract by preheating your oven to 350°F (175°C). It’s crucial to preheat your oven properly so that the cake bakes evenly. Next, generously grease and flour a 10-cup bundt pan. Don’t skimp on this step! Ensure every nook and cranny of the pan is coated with grease (I like to use shortening or a baking spray that contains flour) and then dusted with flour. This will prevent your beautiful cake from sticking. Excess flour can be tapped out.
Mix the Batter: In a large mixing bowl, combine the yellow cake mix, eggs, sour cream, vegetable oil, water, and vanilla extract. Use an electric mixer (handheld or stand mixer) on medium speed to beat the ingredients for about two minutes, until the batter is smooth and well combined. Scrape down the sides of the bowl periodically to ensure everything is incorporated. The sour cream is our secret ingredient here; it adds incredible moisture and tenderness to the cake, making it a far cry from a basic box mix.
Bake the Cake: Pour the cake batter evenly into the prepared bundt pan. Gently tap the pan on the counter a couple of times to release any large air bubbles. Place the bundt pan in the center of the preheated oven. Bake for 30-35 minutes, or until a wooden skewer or toothpick inserted into the thickest part of the cake comes out clean. Keep an eye on your cake towards the end of the baking time, as oven temperatures can vary.
Cooling Process: Once baked, carefully remove the bundt pan from the oven. Let the cake cool in the pan on a wire rack for about 15-20 minutes. This initial cooling period is essential to allow the cake to firm up slightly before you attempt to unmold it. Trying to remove it too soon can result in a broken cake.
Unmolding and Final Cooling: After the initial cooling, invert the bundt pan onto the wire rack and gently lift the pan away. If you greased and floured your pan thoroughly, the cake should release smoothly. If it seems a little stuck, you can gently tap the sides of the pan or carefully run a thin spatula around the edges. Allow the cake to cool completely on the wire rack before frosting. This is very important; if you try to frost a warm cake, the frosting will melt and slide right off.
Decorating Your Easter Basket
Now for the fun part – transforming our cooled bundt cake into an adorable Easter basket!
Frosting the Basket
This is where we’ll bring our basket to life.
Prepare the Green Frosting: While the cake is cooling, prepare your frosting. In a medium bowl, combine the vanilla frosting with a few drops of green food coloring. Stir until the color is uniform. You can add more food coloring gradually to achieve your desired shade of Easter green. For a lighter spring green, start with just a couple of drops. For a deeper, more vibrant green, add more.
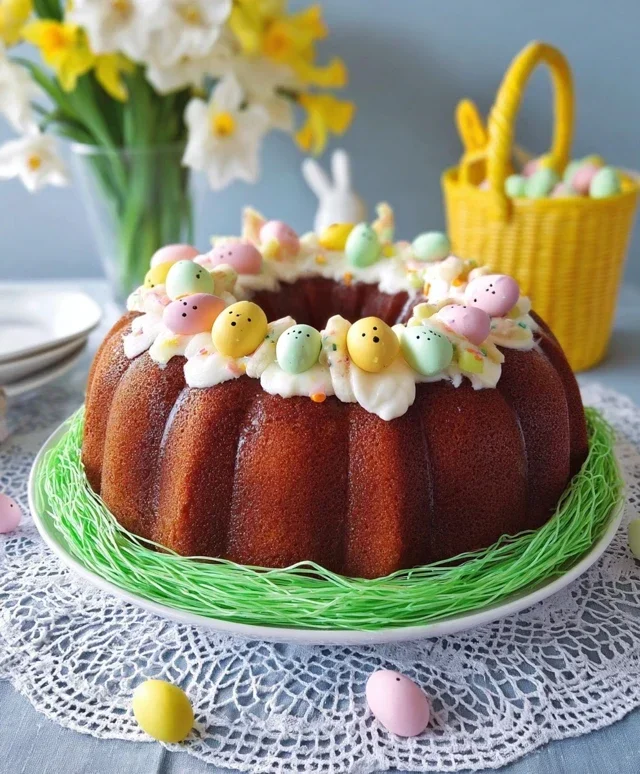
Frost the Cake: Once the cake is completely cool, place it on your serving platter. Using an offset spatula or a butter knife, generously spread the green frosting all over the bundt cake, making sure to coat the entire surface. Aim for an even layer. This will be the “grass” or the woven texture of our basket. Don’t worry about making it perfectly smooth; a slightly textured look can actually enhance the basket illusion.
Create the Handle: To create the handle of your Easter basket, you have a couple of options. You can either use a piece of licorice lace or a sturdy candy cane, bending it into a handle shape and gently pressing one end into the top of the cake. Alternatively, you can pipe a thicker strand of green frosting in a curved shape over the top of the bundt cake to mimic a handle. If you’re using the frosting method, ensure the frosting is thick enough to hold its shape.
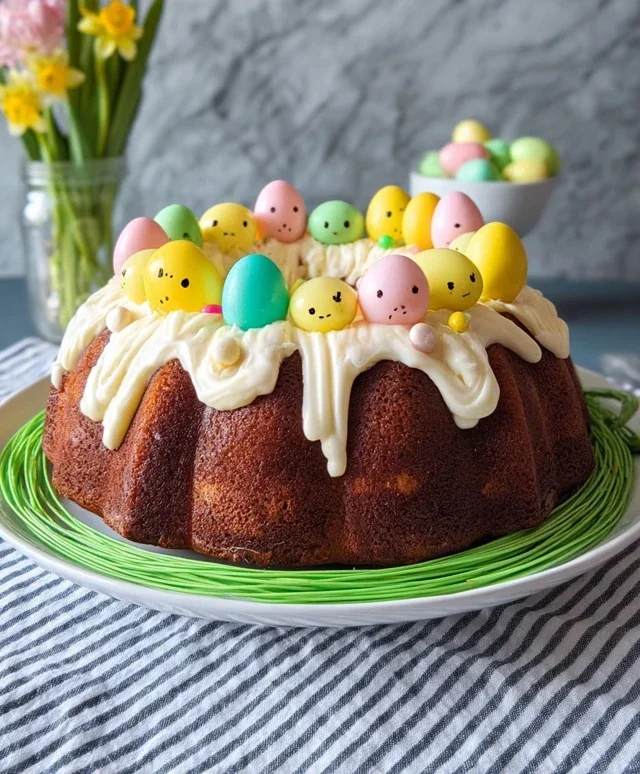
Fill with Candy Eggs: This is where your Easter basket truly comes to life! Arrange your assorted candy Easter eggs in the center of the bundt cake, filling the “basket” cavity. Be creative with your arrangement! You can pile them high, create patterns, or mix and match different types of candy for visual interest. This is your chance to let your creativity shine.
Final Touches: If you’re feeling extra festive, you can sprinkle some edible glitter or additional colorful sprinkles over the cake and around the candy eggs for an extra touch of sparkle and Easter cheer. Step back and admire your beautiful creation! This cake is sure to be a hit with everyone, young and old.
Enjoy your delicious and festive Easter Basket Bundt Cake! It’s a delightful way to celebrate the season and share a sweet treat with loved ones. Happy Easter baking!
Conclusion:
So there you have it – a delightfully easy and incredibly festive Easter Basket Bundt Cake that’s sure to be the star of your spring celebrations! This recipe is fantastic because it simplifies what can sometimes feel like an intimidating cake into a truly achievable and rewarding baking project. The beautiful bundt shape naturally lends itself to a basket-like appearance, and with just a few simple decorating touches, you’ll create a showstopper that tastes just as amazing as it looks. It’s the perfect way to bring a burst of spring flavor and cheer to your Easter brunch or dessert table.
When it comes to serving, this Easter Basket Bundt Cake is wonderful on its own, but consider pairing it with fresh berries, a dollop of whipped cream, or a light vanilla bean ice cream for an extra special treat. For variations, feel free to add lemon zest to the batter for a brighter citrus note, or incorporate a handful of chopped white chocolate chips for added texture and sweetness. You can also experiment with different colored glazes to truly personalize your “basket.” I truly encourage you to give this recipe a try – I’m confident you’ll love how simple it is to create such a beautiful and delicious dessert!
Frequently Asked Questions:
Can I make this cake ahead of time?
Absolutely! This Easter Basket Bundt Cake can be baked and cooled completely a day in advance. Once cooled, wrap it tightly in plastic wrap and store it at room temperature. Decorate it a few hours before serving to ensure the glaze is set but still fresh.
What if I don’t have a bundt pan?
While a bundt pan is ideal for the basket shape, you can adapt this recipe for a standard 9-inch round cake pan or a loaf pan. Baking times may vary, so start checking for doneness a bit earlier than the recipe suggests. You can then get creative with decorating to mimic the Easter basket theme.
Easter Basket Bundt Cake Recipe (Easy Spring Dessert!)
A delightful and easy Easter Basket Bundt Cake, perfect for a spring celebration. This festive dessert is sure to impress your guests.
Ingredients
-
1 box yellow cake mix
-
1/3 cup vegetable oil
-
2 large eggs
-
1 cup sour cream
-
1 teaspoon vanilla extract
-
1/4 cup milk
-
1 can (16 ounces) frosting
-
Green food coloring
-
Assorted Easter candies
Instructions
-
Step 1
Preheat oven to 350 degrees F (175 degrees C). Grease and flour a Bundt cake pan. -
Step 2
In a large bowl, combine the yellow cake mix, vegetable oil, eggs, sour cream, vanilla extract, and milk. Beat on medium speed until well combined and smooth. -
Step 3
Pour the batter evenly into the prepared Bundt cake pan. -
Step 4
Bake for 30-35 minutes, or until a wooden skewer inserted into the center comes out clean. -
Step 5
Let the cake cool in the pan for 10 minutes before inverting it onto a wire rack to cool completely. -
Step 6
While the cake cools, tint the frosting with green food coloring to resemble grass. -
Step 7
Once the cake is completely cool, spread the green frosting over the top and sides of the Bundt cake. Decorate with assorted Easter candies to resemble an Easter basket.
Important Information
Nutrition Facts (Per Serving)
It is important to consider this information as approximate and not to use it as definitive health advice.
Allergy Information
Please check ingredients for potential allergens and consult a health professional if in doubt.