Gyeran Mari Korean Rolled Omelette Easy Recipe
Gyeran Mari, a beloved Korean rolled omelette, is more than just breakfast; it’s a delightful visual and culinary experience that brings a touch of elegance to any meal. I’ve always been fascinated by how such simple ingredients – eggs, a splash of milk, and your favorite fillings – can transform into something so intricate and satisfying. What truly makes Gyeran Mari special is its versatility. It’s a perfect side dish, a portable lunch option, or even a delightful appetizer. The way the vibrant fillings are encased in the tender, golden layers of egg creates a beautiful mosaic that’s almost too pretty to eat. But trust me, once you taste that delicate balance of savory and fluffy, you’ll understand why Gyeran Mari is a staple in Korean households and a star on my kitchen table. Let’s get ready to master this wonderfully customizable dish!

Gyeran Mari (Korean Rolled Omelette)
Gyeran Mari, which literally translates to “egg roll,” is a beloved Korean dish that’s as versatile as it is delicious. It’s a fantastic side dish, a comforting breakfast, or even a satisfying snack. The beauty of Gyeran Mari lies in its simplicity and the delightful textural contrast between the soft, rolled egg layers and the finely diced vegetables. It’s surprisingly easy to make at home, and once you get the hang of it, you’ll find yourself making it again and again. The gentle sweetness of the egg, complemented by the subtle crunch of the vegetables, makes it a crowd-pleaser for all ages. Plus, it’s a great way to sneak in some extra veggies without anyone complaining!
Let’s get started on creating this delightful Korean classic in your own kitchen.
Ingredients:
Cooking Instructions
The key to a beautiful Gyeran Mari is a good non-stick pan and a steady hand. Don’t worry if your first attempt isn’t perfectly cylindrical; it will still taste amazing!
Step 1: Preparing the Egg Mixture
In a medium-sized bowl, crack all 5 medium eggs. Add the salt and the black or white pepper. Using a whisk or a fork, beat the eggs until the yolks and whites are thoroughly combined. You want a uniform yellow color with no streaks of yolk or white remaining. This ensures that each layer of your rolled omelette will have a consistent flavor and texture. Once the eggs are well beaten, gently fold in the chopped green onion and the finely chopped or grated carrot. The vibrant green of the scallions and the bright orange of the carrots will not only add visual appeal but also a subtle sweetness and a slight textural contrast to the soft egg. Make sure the vegetables are evenly distributed throughout the egg mixture.
Step 2: Heating the Pan and Initial Layer
Place a non-stick skillet over medium-low heat. It’s crucial to use a non-stick pan for this recipe; it makes the rolling process significantly easier and prevents the omelette from sticking and tearing. Add the 1 teaspoon of neutral oil to the pan and swirl it around to coat the bottom evenly. Let the oil heat up for about 30 seconds to a minute, ensuring it’s hot enough to cook the egg but not so hot that it burns. Pour about one-third of the egg mixture into the heated pan. Tilt the pan to spread the egg mixture thinly and evenly across the bottom, forming a thin crepe-like layer. Allow this first layer to cook until the edges start to set and the surface is no longer completely liquid, but still slightly moist. This usually takes about 1 to 2 minutes.
Step 3: Rolling the First Layer
Once the first layer is mostly set, it’s time to start rolling. Using a spatula, carefully lift one edge of the cooked egg and begin extract to roll it towards the other side. If you’re right-handed, start from the left side and roll towards the right. If you’re left-handed, do the opposite. You want to create a tight but gentle roll. Don’t worry if it’s not a perfect log at this stage. Once you’ve rolled this portion, push the rolled egg to one side of the pan, leaving some space.
Step 4: Adding Subsequent Layers and Rolling
Now, pour another third of the remaining egg mixture into the empty space in the pan, allowing it to flow underneath and around the rolled egg. Gently lift the existing roll and tilt the pan to ensure the new egg mixture spreads evenly and connects with the existing roll, forming a larger, single layer. Cook this new layer until it’s mostly set, similar to the first layer. Then, using your spatula, begin extract rolling the entire thing, including the newly added egg, towards the opposite side of the pan. This process of adding a thin layer of egg, cooking it slightly, and then rolling the existing omelette over it is repeated until all the egg mixture is used. The goal is to build up the thickness of the omelette with each roll.
Step 5: Completing the Roll and Finishing
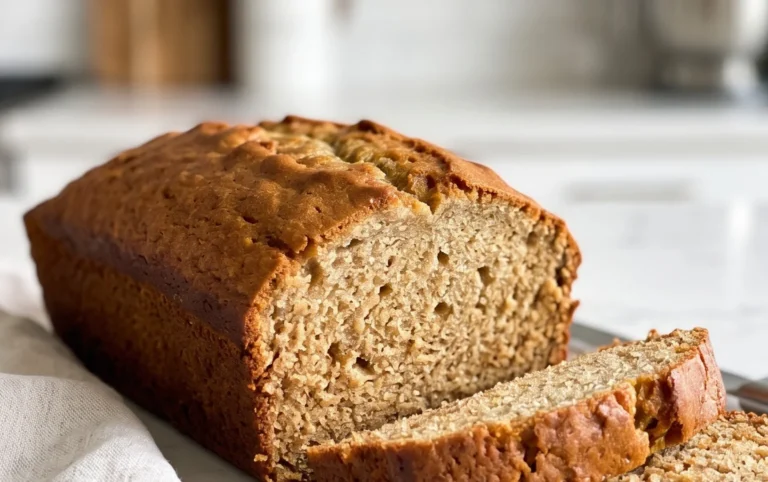
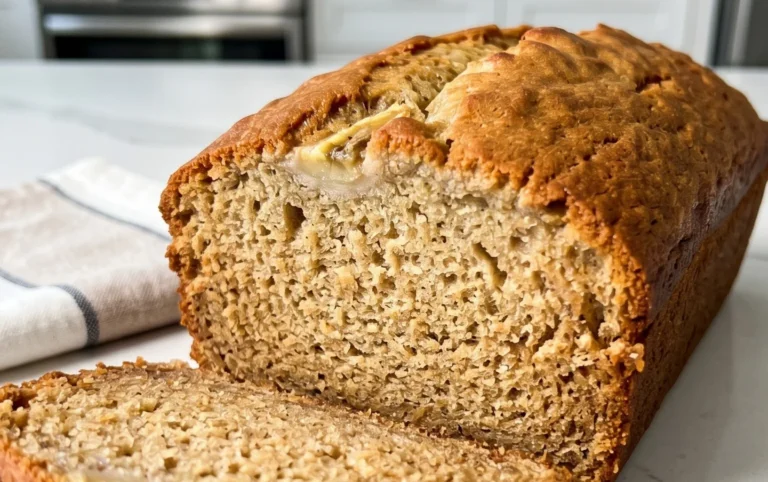
Continue this process of adding the remaining egg mixture in thin layers and rolling until all the egg has been cooked and incorporated into one thick, rolled omelette. As you add the final layer, ensure it connects well with the previous roll and cook it until the entire omelette is cooked through and slightly golden brown on the bottom. You can gently press down on the omelette with your spatula to help it hold its shape and ensure even cooking. Once fully cooked, carefully slide the Gyeran Mari onto a clean cutting board. Allow it to cool for a minute or two before slicing. This brief cooling period helps the omelette firm up, making it easier to slice cleanly. Using a sharp knife, slice the Gyeran Mari into ½ to ¾-inch thick rounds. Serve immediately as a side dish with your favorite Korean meal or enjoy it on its own. The beautiful layers and colorful flecks of vegetables make it a visually appealing and utterly delicious treat.

Conclusion:
And there you have it – a delightful journey into making Gyeran Mari, the versatile Korean Rolled Omelette! This recipe is truly fantastic because it’s incredibly simple to prepare, yet offers such satisfying results. It’s a perfect dish for busy weeknights, a delightful addition to a lunchbox, or even an impressive appetizer for guests. The fluffy, layered texture and the subtle savory flavor make it a winner for all ages. I love how customizable it is, allowing you to tailor it to your personal tastes.
Gyeran Mari shines when served warm, and it pairs beautifully with a variety of sides. Consider enjoying it alongside some steamed rice and kimchi for a classic Korean meal. It also makes a wonderful snack on its own, perhaps with a light soy-based dipping sauce. For variations, don’t be afraid to experiment! Adding finely chopped vegetables like carrots, scallions, or even a sprinkle of cheese can elevate your Gyeran Mari to new heights. You could even incorporate some crum extractbled tofu for added protein. I truly encourage you to give this recipe a try; you’ll be amazed at how easy and rewarding it is to create this beloved Korean dish!
Frequently Asked Questions about Gyeran Mari:
Q1: Can I make Gyeran Mari ahead of time?
While Gyeran Mari is best enjoyed fresh and warm, you can prepare it a few hours in advance. Once cooled, wrap it tightly in plastic wrap and store it in the refrigerator. To reheat, you can gently warm it in a non-stick pan over low heat or in a microwave. Keep in mind that the texture might be slightly different after reheating.
Q2: What kind of pan is best for making Gyeran Mari?
A non-stick skillet is highly recommended for making Gyeran Mari. This will prevent the omelette from sticking and make the rolling process much smoother. A rectangular or square-shaped pan can be helpful in achieving a neat, uniform roll, but a round skillet will work perfectly fine as well.
Gyeran Mari (Korean Rolled Omelette)
A simple and flavorful Korean rolled omelette, perfect for breakfast, a side dish, or a bento box addition.
Ingredients
-
5 medium eggs
-
1 green onion (chopped)
-
2 tbsp carrot (chopped or grated)
-
1/4 tsp salt
-
1/8 tsp black pepper
-
1 tsp neutral oil
Instructions
-
Step 1
In a medium bowl, whisk together the eggs, chopped green onion, chopped carrot, salt, and pepper until well combined. -
Step 2
Heat the neutral oil in a non-stick frying pan or a rectangular omelette pan over medium-low heat. -
Step 3
Pour about one-third of the egg mixture into the pan, tilting the pan to spread it into a thin, even layer. -
Step 4
As the egg begins to set, gently roll it up from one end of the pan to the other using a spatula. Push the rolled omelette to the edge of the pan. -
Step 5
Pour another third of the egg mixture into the empty part of the pan, lifting the rolled omelette to allow the new mixture to flow underneath. -
Step 6
Once the new layer of egg is mostly set, roll the existing omelette into this new layer, continuing to form a thicker roll. -
Step 7
Repeat the process with the remaining egg mixture, rolling it onto the existing omelette until all the egg is used and you have a thick, layered roll. -
Step 8
Once fully cooked, remove the rolled omelette from the pan and let it cool slightly on a cutting board. Slice into thick pieces before serving.
Important Information
Nutrition Facts (Per Serving)
It is important to consider this information as approximate and not to use it as definitive health advice.
Allergy Information
Please check ingredients for potential allergens and consult a health professional if in doubt.