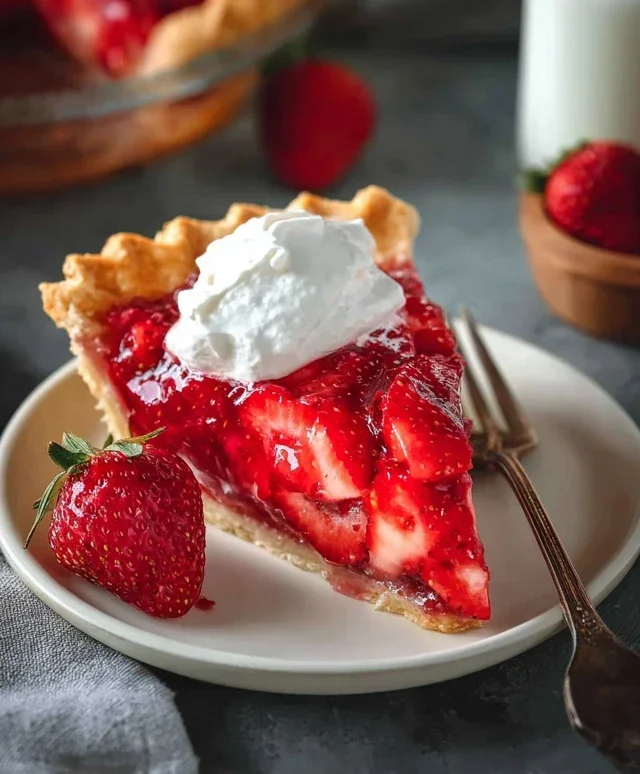
Strawberry Glaze Cookies- Easy & Delicious Treat
Strawberry Glaze Cookies are more than just a sweet treat; they’re a little bite of sunshine that instantly brightens any day. Imagin extracte delicate, buttery cookies, perfectly baked to a golden crisp, generously adorned with a vibrant, luscious strawberry glaze. It’s no wonder these cookies are a perennial favorite! The delightful contrast between the tender cookie and the slightly tangy, sweet glaze is simply irresistible, creating a flavor profile that’s both comforting and exciting. What truly sets these Strawberry Glaze Cookies apart is their elegant simplicity. They’re not overly fussy, yet they deliver an extraordinary taste experience that feels truly special. Whether you’re looking for the perfect addition to a tea party, a charming homemade gift, or just a way to treat yourself, these cookies are guaranteed to impress.

Ingredients:
- 1 cup unsalted butter, softened
- 1 cup granulated sugar
- 2 large eggs
- 2 teaspoons vanilla extract
- 3 cups all-purpose flour
- 1 teaspoon baking powder
- ½ teaspoon salt
- ½ cup strawberry jam (for the cookie dough)
- 1 cup powdered sugar (for the glaze)
- 2 tablespoons strawberry jam (for the glaze)
- 2 tablespoons milk (for the glaze)
Cookie Dough Preparation
Creaming the Butter and Sugar
Let’s begin extract by crafting the perfect cookie base. In a large mixing bowl, combine the softened unsalted butter and granulated sugar. I like to use my stand mixer for this, but a hand mixer or even a sturdy whisk and some elbow grease will work beautifully. Cream these two ingredients together on medium speed until the mixture is light, fluffy, and pnon-alcoholic ale yellow in color. This process is crucial as it incorporates air into the dough, which contributes to a tender cookie texture. Scrape down the sides of the bowl periodically to ensure everything is well combined. This usually takes about 3-5 minutes.
Adding Wet Ingredients
Next, it’s time to introduce the eggs and vanilla extract. Add the two large eggs, one at a time, beating well after each addition until fully incorporated. It’s important to add them one by one to prevent the mixture from separating. Following the eggs, stir in the vanilla extract. The vanilla adds a wonderful depth of flavor that complements the sweetness of the sugar and the eventual strawberry glaze. Continue to beat until everything is smooth and homogenous.
Incorporating Dry Ingredients and Jam
Now, let’s bring in the dry ingredients. In a separate medium bowl, whisk together the all-purpose flour, baking powder, and salt. This ensures that the leavening agent and salt are evenly distributed throughout the flour, preventing any pockets of baking powder or salt in your cookies. Gradually add this dry mixture to the wet ingredients in three additions, mixing on low speed until just combined. Be careful not to overmix at this stage; overmixing can develop the gluten in the flour too much, resulting in tough cookies. Finally, gently fold in the ½ cup of strawberry jam. This jam will not only add a lovely subtle strawberry flavor and color to the cookie itself, but it will also create delightful little pockets of fruitiness within each bite.
Chilling and Shaping the Dough
Once the dough is fully combined with the jam, cover the bowl tightly with plastic wrap. It’s important to chill the dough in the refrigerator for at least 1 hour, or ideally 2-3 hours. This chilling period is essential for several reasons. Firstly, it firms up the butter, making the dough easier to handle and preventing the cookies from spreading too much during baking. Secondly, it allows the flavors to meld together beautifully. After chilling, the dough will be quite firm. You can then scoop rounded tablespoons of dough and roll them into balls. For a slightly more rustic look, you can also just drop spoonfuls of dough onto your baking sheets. Place the dough balls or mounds about 2 inches apart on baking sheets lined with parchment paper to prevent sticking and ensure even baking.
Baking the Cookies
Baking Process
Preheat your oven to 350°F (175°C). Bake the cookies for 10-12 minutes, or until the edges are lightly golden brown and the centers look set but are still slightly soft. Keep a close eye on them, as oven temperatures can vary. Overbaking will lead to dry cookies, so it’s better to err on the side of slightly underbaked in the center, as they will continue to cook on the baking sheet after removal from the oven. Once baked, let the cookies cool on the baking sheets for 5 minutes before transferring them to a wire rack to cool completely. This resting period on the baking sheet helps them to set properly.
Strawberry Glaze Preparation and Application
Making the Glaze
While the cookies are cooling, prepare the delectable strawberry glaze. In a small bowl, combine the powdered sugar and the 2 tablespoons of strawberry jam. Whisk them together until a thick gin extractte begins to form. Gradually add the 2 tablespoons of milk, a little at a time, whisking continuously until you achieve a smooth, pourable glaze consistency. You want the glaze to be thick enough to coat the cookies without running off completely, but thin enough to be drizzled or dipped easily. If it’s too thick, add another splash of milk; if it’s too thin, add a bit more powdered sugar.
Glazing the Cookies
Once the cookies are completely cool, it’s time for the final flourish! You can dip the tops of each cookie into the glaze, or for a more controlled application, use a spoon to drizzle the glaze over the tops. You can also use a piping bag with a small round tip for a more decorative finish. For that extra burst of strawberry flavor and visual appeal, I like to drizzle a little extra jam on top of the glaze while it’s still wet, or even add a few fresh strawberry slices if you’re feeling fancy. Allow the glaze to set completely before stacking or storing the cookies. This usually takes about 30 minutes to an hour at room temperature. Enjoy your beautiful and delicious Strawberry Glaze Cookies!

Conclusion:
There you have it – the ultimate guide to crafting delightful Strawberry Glaze Cookies! We’ve walked through each step, from selecting the perfect strawberries to achieving that irresistible glossy glaze. These cookies are more than just a treat; they’re a little bite of sunshine, perfect for sharing or savoring yourself. They bake up beautifully, offering a tender crum extractb with a sweet, tangy strawberry finish that’s simply addictive.
For the best experience, I love serving these Strawberry Glaze Cookies alongside a cup of freshly brewed tea or a cold glass of milk. They also make a charming addition to any dessert platter, alongside fresh fruit or a scoop of vanilla ice cream. Feel free to get creative with the glaze – a touch of lemon zest can add a lovely brightness, or you could even swirl in a little cream cheese for a richer flavor profile. Don’t be afraid to experiment and make these cookies your own!
I truly hope you enjoy making and, of course, eating these wonderful Strawberry Glaze Cookies. They are a testament to how simple ingredients can create something truly spectacular. So gather your ingredients, put on your favorite apron, and get baking!
Frequently Asked Questions:
How can I store my Strawberry Glaze Cookies?
For the best freshness, store your cooled Strawberry Glaze Cookies in an airtight container at room temperature for up to 3-4 days. If the glaze has fully set, you can layer them with parchment paper to prevent sticking. For longer storage, you can freeze them in a single layer on a baking sheet until firm, then transfer to a freezer-safe bag or container for up to 2 months. Thaw at room temperature.
Can I make the strawberry glaze ahead of time?
Yes, you absolutely can! You can prepare the strawberry glaze a day or two in advance and store it in an airtight container in the refrigerator. Before glazing your cookies, gently warm the glaze over low heat or in short bursts in the microwave, stirring until smooth and pourable again. You might need to add a tiny splash of water or lemon juice if it becomes too thick.
Strawberry Glaze Cookies- Easy & Delicious Treat
Easy and delicious strawberry glaze cookies with a hint of jam in the dough and a sweet strawberry glaze on top.
Ingredients
-
1 cup unsalted butter, softened
-
1 cup granulated sugar
-
2 large eggs
-
2 teaspoons vanilla extract
-
3 cups all-purpose flour
-
1 teaspoon baking powder
-
½ teaspoon salt
-
½ cup strawberry jam (for the cookie dough)
-
1 cup powdered sugar (for the glaze)
-
2 tablespoons strawberry jam (for the glaze)
-
2 tablespoons milk
Instructions
-
Step 1
Cream softened butter and granulated sugar until light and fluffy. -
Step 2
Add eggs one at a time, beating well after each, then stir in vanilla extract. -
Step 3
Whisk together flour, baking powder, and salt. Gradually add to wet ingredients, mixing until just combined. Gently fold in ½ cup strawberry jam. -
Step 4
Chill dough for at least 1 hour. Scoop rounded tablespoons of dough and roll into balls. Place 2 inches apart on parchment-lined baking sheets. -
Step 5
Bake at 350°F (175°C) for 10-12 minutes, until edges are golden brown. Cool on baking sheets for 5 minutes, then transfer to a wire rack to cool completely. -
Step 6
Make the glaze: Combine powdered sugar and 2 tablespoons strawberry jam. Gradually whisk in milk until smooth and pourable. -
Step 7
Once cookies are completely cool, dip tops in glaze or drizzle over. Allow glaze to set completely.
Important Information
Nutrition Facts (Per Serving)
It is important to consider this information as approximate and not to use it as definitive health advice.
Allergy Information
Please check ingredients for potential allergens and consult a health professional if in doubt.