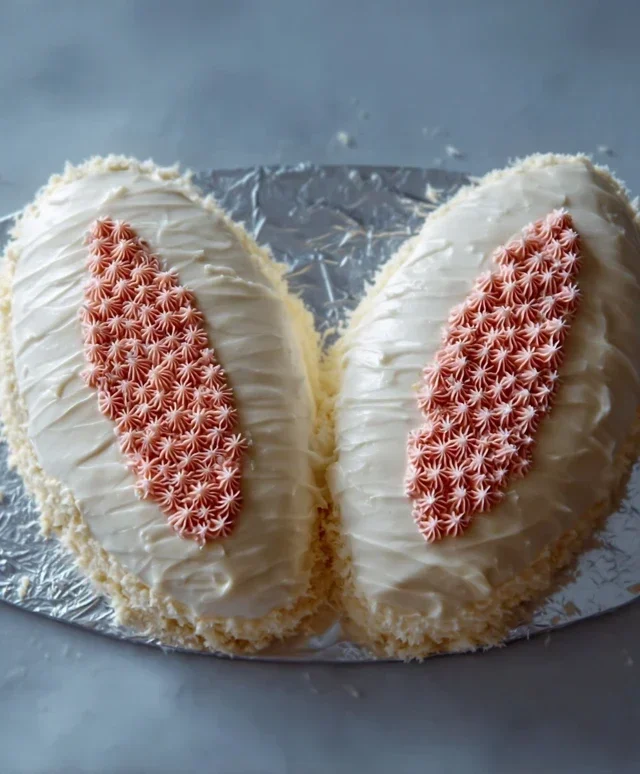
Bunny Rabbit Cake- Delicious Easter Treat
This Bunny Rabbit Cake is more than just a dessert; it’s an absolute celebration waiting to happen! Who can resist the sheer joy and adorable charm of a cake shaped like a fluffy bunny? From birthdays to Easter gatherings, this delightful creation is guaranteed to bring smiles and squeals of delight to everyone, young and old. We all have those cherished memories tied to special treats, and I can bet that a beautifully decorated Bunny Rabbit Cake holds a prime spot in many of yours. What truly sets this cake apart is its versatility; you can customize the frosting colors, add sprinkles galore, or even give your bunny a unique personality with candy accents. It’s a canvas for your creativity, resulting in a show-stopping centerpiece that’s as delicious as it is visually enchanting. Get ready to hop into some serious baking fun!
Here’s the main content for a recipe article about a Bunny Rabbit Cake:
Bunny Rabbit Cake
Get ready to hop with joy because we’re making a delightful Bunny Rabbit Cake! This is more than just a cake; it’s a whimsical creation that’s perfect for Easter, birthdays, or any occasion that calls for a touch of adorable fun. Imagin extracte a fluffy, tender cake shaped into a sweet bunny, ready to be decorated and devoured. This recipe is designed to be achievable even for begin extractner bakers, and the result is always a showstopper that will bring smiles to everyone’s faces. Let’s dive in and create some magic!
Ingredients:
Preparing the Batter
The foundation of our delightful bunny is a tender and moist vanilla cake. We’ll start by gathering all our ingredients and ensuring they are at the correct temperatures, as this really helps with creating a smooth and well-emulsified batter. Softened butter and room temperature eggs incorporate more easily and create a lighter cake crum extractb. Sifting your dry ingredients together is also a crucial step to ensure even leavening and a cake that rises beautifully. Don’t skip this!
Baking the Cake Layers
For our bunny shape, we’ll be using a standard 9-inch round cake pan and a bowl-shaped cake pan (often called a “bowl pan” or “dome pan”). If you don’t have a bowl pan, you can creatively use a heatproof mixing bowl. Grease and flour your pans thoroughly to prevent sticking – a common baking woe! Alternatively, you can use parchment paper rounds for extra security. For the bowl pan, filling it about two-thirds full is generally a good rule of thumb to allow for a nice dome without overflowing.
Cooking Instructions:
1. Preheat and Prepare Pans: Begin extract by preheating your oven to 350°F (175°C). Take your 9-inch round cake pan and your bowl-shaped cake pan (or your heatproof mixing bowl) and generously grease them with butter or non-stick cooking spray. Follow this by dusting them with flour, tapping out any excess. For the bowl pan, you can also line the bottom with a circle of parchment paper for added insurance against sticking. Properly prepared pans are key to a cake that releases cleanly.
2. Mix Dry Ingredients: In a medium-sized bowl, whisk together the all-purpose flour, baking powder, and salt. Whisking them together thoroughly ensures that the leavening agents and salt are evenly distributed throughout the flour. This is important for a consistent rise and flavor in your cake. Set this bowl aside for now.
3. Cream Butter and Sugar: In a large mixing bowl, beat the softened unsalted butter and granulated sugar together using an electric mixer on medium speed. Creaming them until the mixture is light and fluffy, which usually takes about 3-5 minutes, incorporates air into the batter. This air is what contributes to a lighter and more tender cake. Scrape down the sides of the bowl occasionally to make sure everything is evenly mixed.
4. Add Eggs and Vanilla: Add the large eggs, one at a time, beating well after each addition. Make sure each egg is fully incorporated before adding the next. This gradual addition helps to create a stable emulsion. After all the eggs are added, stir in the vanilla extract until just combined.
5. Combine Wet and Dry Ingredients: With the mixer on low speed, gradually add the dry ingredients to the wet ingredients, alternating with the milk. Begin extract and end with the dry ingredients. For example, add about a third of the flour mixture, mix until just combined, then add half of the milk, mix, then another third of the flour, the remaining milk, and finally the last third of the flour. Be careful not to overmix at this stage; overmixing can develop the gluten in the flour, resulting in a tougher cake. Mix only until the ingredients are just incorporated and no dry streaks of flour remain.
6. Bake the Cakes: Divide the batter evenly between your prepared round cake pan and your bowl-shaped cake pan. The round cake will form the body of the bunny, and the bowl-shaped cake will be the head. Place both pans in the preheated oven. Bake for approximately 25-35 minutes for the round cake and 35-45 minutes for the bowl-shaped cake, or until a wooden skewer or toothpick inserted into the center of each cake comes out clean. The exact baking time will vary depending on your oven. Keep an eye on them to prevent burning.
7. Cool the Cakes: Once baked, remove the cakes from the oven and let them cool in their pans for about 10-15 minutes before inverting them onto a wire rack to cool completely. It’s very important that the cakes are entirely cool before you attempt to frost and assemble them. Warm cakes are fragile and will lead to frosting that melts and slides off, creating a mess. Patience here is key to a beautiful final presentation.
Making the Bunny Frosting
This simple buttercream is perfect for decorating. It’s creamy, sweet, and holds its shape well, making it ideal for creating all the details of our bunny.
Assembling and Decorating Your Bunny
This is where the real fun begin extracts! Once your cakes are completely cool, it’s time to bring our bunny to life.
8. Prepare the Frosting: While the cakes are cooling, prepare your frosting. In a large bowl, beat the sifted confectioners’ sugar with the milk or heavy cream and the vanilla extract until smooth and creamy. Start with the lesser amount of liquid and add more if needed to reach your desired consistency. You want a frosting that is spreadable but not too runny. If you want to add a touch of color to your bunny’s nose and inner ears, divide a small portion of the frosting and tint it with pink food coloring.
9. Carve and Assemble: Once the cakes are completely cool, place the round cake (the body) flat-side down on your serving platter. Then, take the domed cake (the head) and use a serrated knife to carefully level the very bottom so it sits flat. Place this leveled head cake on top of the body cake. To create the ears, you’ll need to do a little carving. From the remaining cake scraps (or you can bake a small extra cupcake if needed), cut out two ear shapes. You can also use a portion of the domed cake that was leveled off. Arrange these ear shapes on top of the head. If the pieces aren’t sticking, a little bit of frosting can act as “glue.”
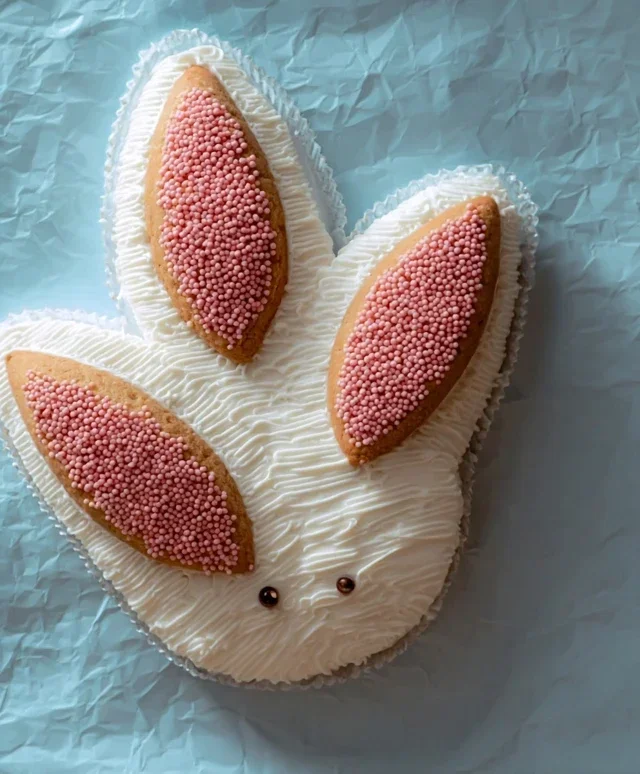
10. Frost the Bunny: Generously frost the entire assembled bunny cake with your white frosting. Use an offset spatula to get smooth sides and to create a fluffy texture on the bunny’s fur. Don’t worry about perfection here; a slightly rustic look can be charming. Then, using the pink frosting, carefully frost the inside of the ears and create a cute little pink nose on the front of the bunny’s head.
11. Add the Finishing Touches: For the bunny’s eyes, you have a couple of options. You can use an edible black food marker to draw on two circles, or you can melt some dark chocolate and pipe or carefully dab on two small circles for eyes. You can also add a little pink frosting to create rosy cheeks. Feel free to get creative with any other decorations you like – perhaps some edible glitter for a touch of sparkle, or even candy buttons for a smile. Your adorable Bunny Rabbit Cake is now ready to be admired and enjoyed!
Conclusion:
And there you have it – a delightful journey into creating your very own Bunny Rabbit Cake! This recipe is truly a showstopper, perfect for Easter celebrations, spring birthdays, or just bringin extractg a smile to someone’s face. Its charm lies in its approachable steps, allowing bakers of all skill levels to achieve a whimsical and delicious result. The moist cake base, paired with a smooth and sweet frosting, creates a delightful combination that’s as enjoyable to eat as it is to behold. I truly hope you’ll feel inspired to try this recipe and experience the joy of crafting such a special treat.
For serving, this Bunny Rabbit Cake is fantastic on its own, allowing its adorable appearance to take center stage. However, consider pairing it with fresh berries like strawberries or raspberries for a burst of color and freshness, or a dollop of whipped cream for an extra layer of indulgence. Don’t be afraid to get creative with variations! You could experiment with different cake flavors like lemon or carrot cake, or even use a different frosting, like cream cheese or chocolate, to personalize your bunny.
Ultimately, the most important ingredient is the fun you have making it. So, gather your loved ones, put on some cheerful music, and let’s bake this adorable Bunny Rabbit Cake together!
Frequently Asked Questions:
Can I make the cake layers ahead of time?
Absolutely! You can bake and cool the cake layers up to two days in advance. Wrap them tightly in plastic wrap and store them at room temperature. This can significantly reduce the stress on the day of decorating, making the whole process more enjoyable.
What if I don’t have a specific piping tip for the bunny’s fur?
No worries at all! You can achieve a similar textured effect by using a star-shaped piping tip, or even just a round tip and moving it in small, random strokes to mimic fur. Alternatively, you could use a fork to gently create lines in the frosting for a slightly different, but still charming, furry look. The key is to have fun with it!
Bunny Rabbit Cake
A whimsical and delightful cake shaped like a bunny rabbit, perfect for Easter or any spring celebration. This recipe yields a moist and tender cake with simple decorating instructions.
Ingredients
-
2 cups all-purpose flour
-
1.5 cups granulated sugar
-
1 teaspoon baking soda
-
0.5 teaspoon salt
-
1 cup buttermilk
-
0.5 cup vegetable oil
-
2 large eggs
-
1 teaspoon vanilla extract
Instructions
-
Step 1
Preheat oven to 350°F (175°C). Grease and flour a 9×13 inch baking pan. -
Step 2
In a large bowl, whisk together flour, sugar, baking soda, and salt. -
Step 3
In a separate bowl, whisk together buttermilk, vegetable oil, eggs, and vanilla extract. -
Step 4
Pour the wet ingredients into the dry ingredients and mix until just combined. Do not overmix. -
Step 5
Pour the batter into the prepared baking pan and bake for 30-35 minutes, or until a toothpick inserted into the center comes out clean. -
Step 6
Let the cake cool in the pan for 10 minutes before inverting it onto a wire rack to cool completely. -
Step 7
Once cooled, the cake can be frosted and decorated as desired to resemble a bunny rabbit.
Important Information
Nutrition Facts (Per Serving)
It is important to consider this information as approximate and not to use it as definitive health advice.
Allergy Information
Please check ingredients for potential allergens and consult a health professional if in doubt.