Easy Bunny Cake-Simple & Sweet Spring Treat
Easy Bunny Cake Recipe: Get ready to hop into springtime fun with this absolutely delightful and incredibly simple easy bunny cake recipe! Whether you’re a seasoned baker or a complete begin extractner, this recipe is designed to bring smiles and deliciousness to your table with minimal fuss. We all love a charming dessert, and this bunny cake is a guaranteed crowd-pleaser, especially around Easter and spring celebrations. It’s more than just a cake; it’s a centerpiece that sparks joy and creates lasting memories. What makes this easy bunny cake recipe truly special is its adorable appearance coupled with its forgiving nature. You don’t need fancy decorating skills to achieve a charming bunny silhouette that will have everyone oohing and aahing. Let’s get baking and bring this sweet, fluffy friend to life!
Easy Bunny Cake Recipe
Get ready to hop into some baking fun with this incredibly simple yet utterly adorable Easy Bunny Cake Recipe! Perfect for Easter, spring birthdays, or just because you want to add a touch of whimsy to your day, this cake is designed for bakers of all skill levels. Forget complicated shaping or fancy techniques; we’re going to transform two simple round cake layers into a charming bunny that will have everyone smiling. It’s a project that’s as enjoyable to make as it is to eat, and the result is always a showstopper!
Ingredients:
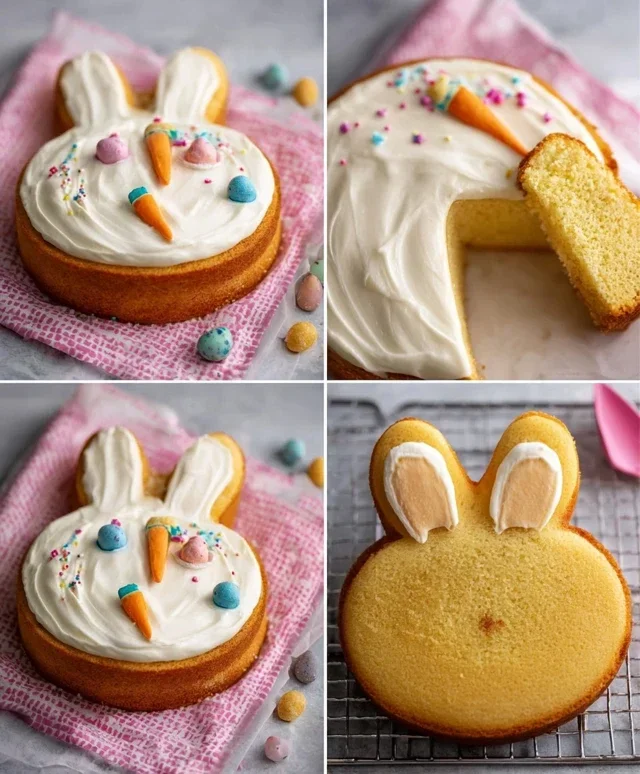
Baking Your Bunny Base
First things first, let’s get our cake layers ready. Whether you’re using a convenient cake mix or your tried-and-true homemade recipe, follow the package or recipe instructions for baking. Ensure you bake them in two identical round cake pans. Once baked, allow the cakes to cool in their pans for about 10-15 minutes before carefully inverting them onto a wire rack to cool completely. It’s crucial that your cakes are fully cooled before frosting; a warm cake will melt your frosting into a sticky mess, and nobody wants that! While your cakes are cooling, you can prepare your frosting. If you’re making your own, get it ready to go. If you’re using store-bought, you might want to give it a quick stir to ensure it’s smooth and spreadable.
Assembling Your Bunny
Once your cake layers are completely cool, it’s time for the fun part – assembly and decorating!
Creating the Bunny Shape: Take one of your round cake layers and place it flat on your serving platter or cake board. This will be the bunny’s body. Now, take your second round cake layer. You’ll need to cut this layer in half to create the bunny’s ears. You can do this by simply slicing the cake layer straight down the middle with a sharp knife. Place these two semi-circles onto your platter, positioning them above the “body” layer to resemble ears. Don’t worry about perfect placement just yet; we’ll adjust as we frost. For stability, you might want to gently press the ear halves down onto the platter so they don’t shift too much. If your cake layers are particularly tall, you could even stack them slightly for a more dimensional bunny, but for this easy version, a single layer for the body is perfect.
Applying the Base Frosting: Now, let’s get to frosting! Using your white frosting, generously cover the entire “body” cake layer. Use an offset spatula or a regular butter knife to spread it smoothly. Don’t aim for perfection at this stage; a slightly rustic look is part of the charm of this easy bunny cake. Then, take your two semi-circles (the ears) and frost them as well. Make sure to get frosting all the way to the edges. Now, carefully position your frosted ears onto the platter, slightly above and angled outwards from the body. You can gently press them into the frosting of the body layer to help them adhere. If you have any extra frosting, you can use it to “glue” the ear pieces to the body layer, or even to smooth out any gaps.
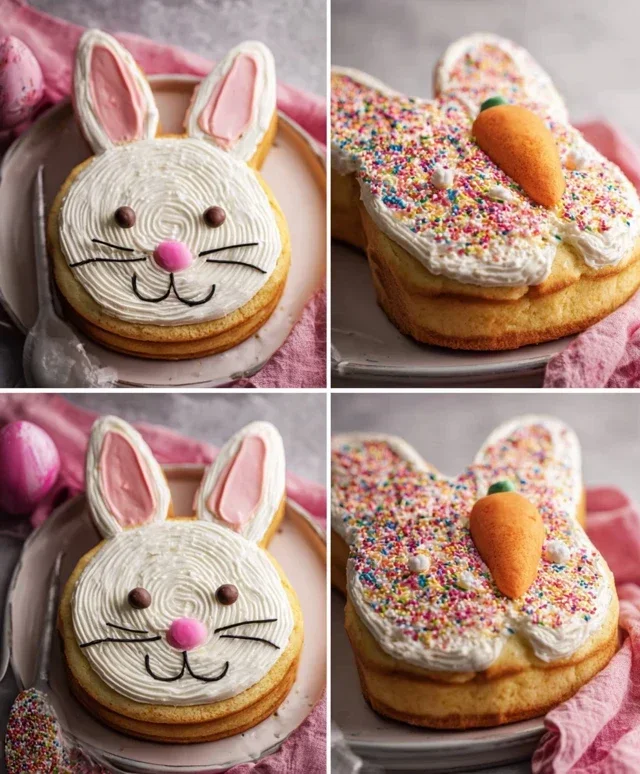
Adding the Bunny’s Face Details: This is where your bunny really starts to come to life! Take your chocolate icing or melted chocolate and your piping bag fitted with a small round tip (or a plastic bag with a snipped corner). We’re going to draw the bunny’s eyes and mouth. For the eyes, pipe two simple dots or slightly larger circles on the top half of the bunny’s body. For the mouth, pipe a small “Y” shape or a gentle curved line below the eyes. If you want to add a touch of definition to the ears, you can pipe a slightly smaller oval shape inside each ear using the chocolate icing, mimicking the inside of a real bunny’s ear. This adds depth and makes your bunny even more special.
Decorating the Bunny’s Nose and Accents: It’s time for the signature bunny nose! Take your pink frosting and pipe a small, round nose in the center of the bunny’s face, just below the eyes. You can use a small round tip or a star tip for this, depending on the look you prefer. A smooth, round nose is classic, but a little fluffy star-shaped nose adds a different kind of cuteness. Now, let’s have some fun with the jellybeans or colorful round candies. You can use these to create a cheerful border around the base of the cake, or even place a few strategically on the bunny’s “cheeks” for a playful touch. Some people like to place a few jellybeans around the bunny’s feet area too, as if they’re hopping along.
Finishing Touches for Fluffiness: For an extra touch of bunny-like charm, you can use your white frosting with a star tip to pipe small dollops of “fur” around the edges of the bunny’s body and ears. This adds a lovely texture and makes your bunny look soft and cuddly. Don’t overthink this; just create little fluffy swirls or dots. You can also pipe a few white frosting “tufts” on top of the bunny’s head, just between the ears, to give the impression of fluffy hair. This step is entirely optional but really elevates the adorable factor of your bunny cake. Chill the cake for about 15-20 minutes before serving to allow the frosting to set slightly, making it easier to slice.
There you have it – a delightful and incredibly easy bunny cake that’s sure to be a hit with everyone! Enjoy your creation!
Conclusion:
And there you have it – a delightful and incredibly easy bunny cake recipe perfect for any springtime celebration or just a fun baking project with loved ones! This recipe truly shines because of its simplicity. You don’t need to be a master baker to achieve a charming bunny masterpiece that will bring smiles all around. The moist cake and simple frosting come together effortlessly, making it an ideal option for begin extractners and busy families alike. We’ve kept it straightforward so you can focus on the fun decorating part!
This bunny cake is wonderfully versatile. Serve it as the centerpiece for your Easter brunch, a festive birthday treat, or even a surprise dessert just because. For serving suggestions, consider pairing a slice with a scoop of vanilla ice cream or a dollop of fresh whipped cream. If you’re feeling adventurous, don’t hesitate to explore variations! You could use a different cake flavor like lemon or chocolate, or experiment with colored frostings to create different bunny looks. Adding sprinkles or edible glitter can also elevate the festive feel.
We genuinely hope you give this easy bunny cake recipe a try. It’s a rewarding and delicious way to add a touch of homemade magic to your special occasions. Happy baking, and enjoy your adorable bunny creation!
Frequently Asked Questions:
Can I make this cake ahead of time?
Yes, absolutely! You can bake the cake layers up to two days in advance and store them, well-wrapped, at room temperature. Frosting the cake the day of serving is generally recommended for the freshest taste and appearance.
What kind of frosting works best?
A simple buttercream frosting is perfect for this cake. It’s easy to make and holds its shape well for decorating. You can also use a cream cheese frosting for a slightly tangier flavor profile.
How can I make the bunny shape more defined?
To achieve a clearer bunny shape, ensure your cake pan is greased and floured thoroughly. After baking and cooling, you can also carefully trim any excess cake with a serrated knife to create sharper edges for the ears and body.
Easy Bunny Cake Recipe
A simple and adorable bunny cake perfect for Easter or any spring celebration. This recipe uses readily available ingredients for a quick and fun baking project.
Ingredients
-
Two round cake layers (use one cake mix or your favorite homemade recipe)
-
White frosting (ready-made or your favorite homemade recipe)
-
Pink frosting (strawberry is commonly available ready-made and comes pink)
-
Chocolate icing or melted chocolate for details
-
Jellybeans or colorful round candies
-
Piping bags
Instructions
-
Step 1
Prepare your two round cake layers according to your chosen cake mix or homemade recipe. Let them cool completely. -
Step 2
Place one cake layer on your serving platter. Generously spread white frosting over the top. -
Step 3
Place the second cake layer on top of the first, creating the base of the bunny. Frost the entire cake with white frosting, smoothing it as much as possible. -
Step 4
Using piping bags, create bunny ears on top of the cake using pink frosting. You can also add a pink nose and inner ear details. -
Step 5
Use chocolate icing or melted chocolate to pipe eyes and a mouth onto the bunny’s face. -
Step 6
Decorate around the base of the cake and the bunny’s face with jellybeans or colorful round candies to add a festive touch.
Important Information
Nutrition Facts (Per Serving)
It is important to consider this information as approximate and not to use it as definitive health advice.
Allergy Information
Please check ingredients for potential allergens and consult a health professional if in doubt.