Red White Blue Dirt Cups- Easy Patriotic Dessert
Red, White and Blue Dirt Cups are a nostalgic trip back to childhood, a truly delightful and surprisingly simple treat that always brings smiles. Whether you’re celebrating a summer holiday, hosting a backyard barbecue, or simply craving a fun dessert, these layered delights are a guaranteed crowd-pleaser. What makes these Red, White and Blue Dirt Cups so beloved? It’s the irresistible combination of creamy pudding, crunchy cookie crum extractbles that mimic rich soil, and the vibrant, patriotic toppings that make them visually stunning and incredibly satisfying. They’re more than just a dessert; they’re a playful expression of summer fun and a reminder of simpler times. You’ll love how easy they are to assemble, allowing you to create a whole batch in minutes, perfect for sharing with family and friends.
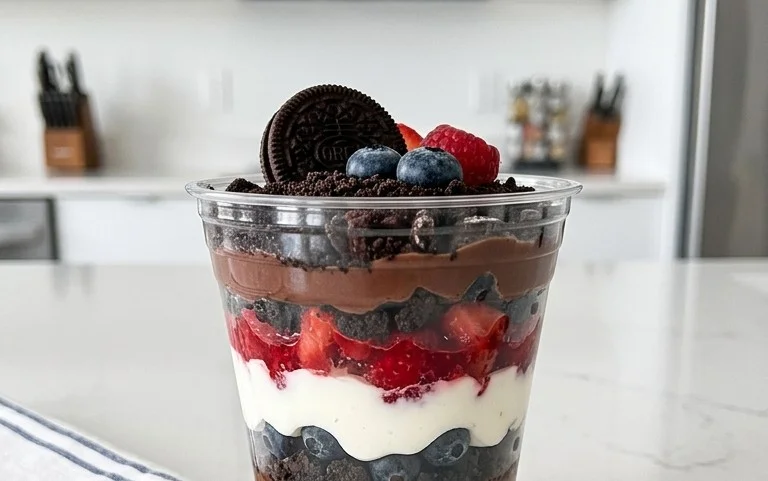
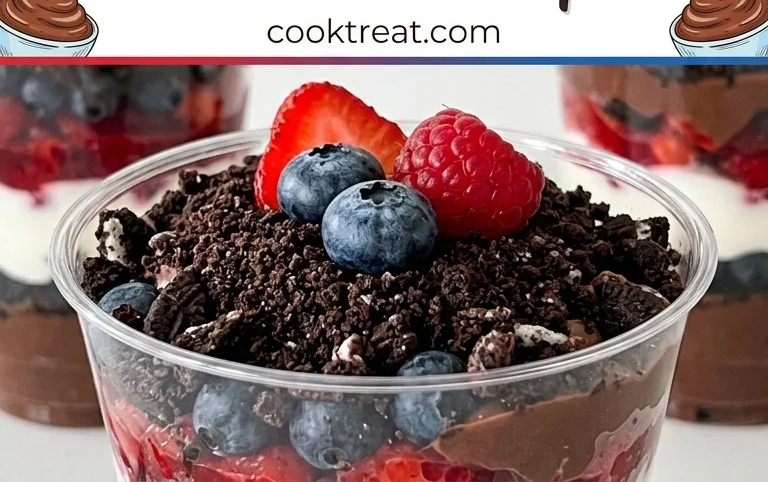
Red, White and Blue Dirt Cups
Get ready for a patriotic treat that’s as fun to make as it is to eat! These Red, White and Blue Dirt Cups are a delightful twist on the classic chocolate pudding and cookie crum extractb dessert. Perfect for Fourth of July parties, summer BBQs, or any occasion where you want to add a splash of festive color, these cups are sure to be a hit with kids and adults alike. The combination of creamy cheesecake pudding, crunchy chocolate cookie crum extractbs, and colorful gummy worms creates a texture and flavor sensation that’s simply irresistible. Plus, the vibrant red, white, and blue layers make them a showstopper! Let’s dive into how we can create these playful desserts together.
Ingredients:
Instructions:
1. Prepare the Chocolate “Dirt” Base: The foundation of our delicious dirt cups is the crushed Oreos. We need to transform these cookies into a crum extractbly, dirt-like texture. To do this, take all 19 Oreo cookies and place them into a sturdy zip-top bag. Seal the bag, removing as much air as possible. Now, the fun part! You can use a rolling pin to gently crush the cookies until they resemble coarse dirt. Alternatively, a food processor can be used for a quicker and more consistent crum extractb. The goal is to have small pieces of cookie with a few slightly larger chunks for interesting texture, mimicking actual soil. Set aside about ¼ cup of these crushed cookies for decorating the very top of each cup to enhance the “dirt” effect.
2. Create the Creamy Cheesecake Pudding: In a large mixing bowl, we’ll prepare the cheesecake pudding. Whisk together the contents of both cheesecake pudding boxes. Gradually add the 4 cups of milk, whisking continuously until the mixture is smooth and well combined. It’s important to whisk vigorously for at least 2 minutes to ensure the pudding starts to thicken and there are no lumps. Once whisked, cover the bowl with plastic wrap, pressing the wrap directly onto the surface of the pudding. This prevents a skin from forming. Refrigerate the pudding for at least 5 minutes to allow it to set slightly before proceeding to the coloring stage. This initial chilling makes it easier to divide and color evenly.
3. Divide and Dye the Pudding: Now for the patriotic colors! After the pudding has chilled for 5 minutes, remove it from the refrigerator. Divide the pudding mixture as evenly as possible into three separate bowls. This is where the magic of red, white, and blue begin extracts. In the first bowl, leave the pudding plain – this will be our white layer. In the second bowl, carefully add ¼ teaspoon of red gel food dye. Gel food coloring is more concentrated than liquid, giving us vibrant colors without adding excess moisture. Stir this pudding thoroughly until the red color is uniformly distributed and no streaks remain. In the third bowl, add ¼ teaspoon of blue gel food dye and stir until the color is consistent. Again, ensure there are no unmixed patches of dye.
4. Assemble the Red, White, and Blue Layers: It’s time to build our beautiful dirt cups! Grab your serving cups or glasses. We’ll start by layering the pudding colors. Begin extract by spooning a layer of the white cheesecake pudding into the bottom of each cup. Follow this with a layer of the red pudding, and then a layer of the blue pudding. Alternatively, you can alternate the order of the colors for a different visual effect. The key is to create distinct layers. Once all the pudding is layered, sprinkle a generous amount of the reserved crushed Oreos over the top of the blue pudding. This creates the “dirt” layer. Gently press down on the cookie crum extractbs to help them adhere to the pudding, but don’t press too hard or you’ll disturb the layers beneath.
5. Add the Finishing Touches and Chill: The final step is to make these dirt cups truly come alive! Take your red and blue gummy worms and insert them into the “dirt” layer of each cup, making them look like they are wriggling out of the ground. You can position them in various ways to add to the playful presentation. Once decorated, cover each cup loosely with plastic wrap or a lid. Refrigerate the dirt cups for at least 30 minutes, or ideally for 1-2 hours. This chilling time allows the flavors to meld together beautifully and ensures the pudding is firm and the layers are well-defined. Serve cold and enjoy your festive, homemade Red, White and Blue Dirt Cups! They are a guaranteed crowd-pleaser for any celebration.
Conclusion:
I hope you’re feeling inspired to whip up these delightful Red, White and Blue Dirt Cups! This recipe truly is a winner because it’s incredibly easy to assemble, making it perfect for little hands to help with or for a last-minute dessert decision. The combination of creamy pudding, crunchy cookie crum extractbs, and sweet gummy worms offers a fun, textural experience that everyone, especially kids, will adore. They’re visually stunning, embodying the spirit of patriotic celebrations or just a fun summer treat.
These dirt cups are wonderfully versatile. Serve them up in individual clear cups or glasses for a charming presentation. They make fantastic party favors, potluck contributions, or simply a special dessert to brighten any day. Don’t be afraid to get creative with variations! You can swap out the chocolate pudding for vanilla or cheesecake flavor. For an extra festive touch, consider adding a sprinkle of edible glitter on top or using different colored gummy worms. The possibilities are endless!
So, dive in and give these Red, White and Blue Dirt Cups a try. I’m confident you’ll love how simple they are to make and how much joy they bring. Let me know how yours turn out!
Frequently Asked Questions:
Q: Can I make these Red, White and Blue Dirt Cups ahead of time?
Absolutely! These are a fantastic make-ahead dessert. You can assemble them up to a day in advance and store them covered in the refrigerator. The cookies will soften slightly, which many people find even more enjoyable. Just add the gummy worms right before serving to keep them looking their best.
Q: What kind of pudding should I use? Instant or cook-and-serve?
For the quickest and easiest assembly, instant pudding is the way to go. It sets up beautifully and requires minimal effort. If you prefer the taste of cook-and-serve pudding, you can certainly use that, just be sure to allow it to cool completely before layering it with the cookie crum extractbs.
Q: Are there any nut-free options for this recipe?
Yes! If you need a nut-free version, be sure to select a pudding mix that is certified nut-free. Also, check your chocolate sandwich cookies and gummy worms for any potential cross-contamination warnings or hidden nut ingredients. Many brands offer nut-free alternatives, making this a very adaptable recipe for various dietary needs.
Red, White and Blue Dirt Cups
A festive and easy-to-make dessert featuring layers of creamy pudding, crushed Oreos, and patriotic gummy worms.
Ingredients
-
2 boxes cheesecake pudding (3.4 ounces each)
-
4 cups milk
-
19 Oreo cookies (crushed)
-
¼ teaspoon red gel food dye
-
¼ teaspoon blue gel food dye
-
8 red and blue gummy worms
Instructions
-
Step 1
In a large bowl, whisk together the cheesecake pudding mix and milk until well combined. Let it sit for 5 minutes. -
Step 2
Divide the pudding into three equal portions in separate bowls. Leave one portion white. -
Step 3
Add red gel food dye to one portion of pudding and stir until evenly colored. Add blue gel food dye to the second portion and stir until evenly colored. -
Step 4
Spoon a layer of crushed Oreo cookies into the bottom of 8 small cups or jars. -
Step 5
Layer the white pudding over the cookie crumbs. Top with a layer of red pudding, then a layer of blue pudding. -
Step 6
Add another layer of crushed Oreo cookies over the blue pudding to resemble dirt. -
Step 7
Decorate the top of each dirt cup with red and blue gummy worms. Chill for at least 30 minutes before serving.
Important Information
Nutrition Facts (Per Serving)
It is important to consider this information as approximate and not to use it as definitive health advice.
Allergy Information
Please check ingredients for potential allergens and consult a health professional if in doubt.