Renee Paj – Delicious French Dessert Recipe
Renee Paj is more than just a dessert; it’s a warm embrace on a chilly evening, a comforting sigh after a long day, and a nostalgic trip back to cherished memories. If you’ve ever had the pleasure of tasting authentic Renee Paj, you know exactly what I mean. There’s a reason this delightful concoction has captured hearts and taste buds for generations. It’s the perfect harmony of simple, wholesome ingredients transformed into something truly magical. What makes Renee Paj so incredibly special? It’s the delicate balance of creamy sweetness, a hint of warmth from comforting spices, and that irresistible, almost pudding-like texture that melts in your mouth. It’s the kind of dish that brings people together, sparking conversations and creating new traditions. Get ready to fall in love all over again, or for the very first time, with this beloved classic.
Renee Paj
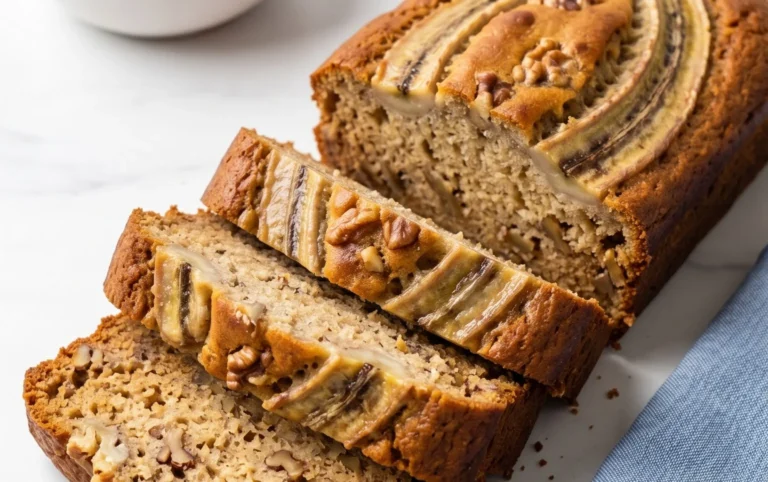
There are some recipes that just feel like home, and for me, Renee Paj is definitely one of them. This isn’t your average banana bread or breakfast pastry; it’s a delightful, comforting creation that strikes the perfect balance between moistness, sweetness, and a hint of spice. I first encountered Renee Paj years ago, and it quickly became a staple in my baking repertoire. It’s incredibly versatile – perfect for a weekend brunch, a delightful afternoon snack with a cup of tea, or even a light dessert. The secret to its wonderful texture and flavor lies in the combination of ripe bananas and a few key pantry staples. The oats add a lovely chegrape juicess, while the cinnamon provides a warm, inviting aroma. Don’t be intimidated by the ingredient list; it comes together quite easily, and the results are always worth it. Let’s get baking!
Ingredients:
Cooking Instructions
Step 1: Preparing the Bananas and Dry Ingredients
The first step to creating our delicious Renee Paj is to get our bananas ready. For the best flavor and texture, make sure you’re using very ripe bananas – the ones with plenty of brown spots are ideal. These will be softer, sweeter, and easier to mash, contributing a wonderful moisture and natural sweetness to the paj. In a medium bowl, I like to mash the banana chunks with a fork until they are mostly smooth but still have a few small lumps. This ensures you get pockets of banana flavor throughout. Once mashed, set them aside.
In a separate, larger bowl, we’ll combine all of our dry ingredients. This ensures everything is evenly distributed, which is key for a consistent bake. So, into this bowl go the old fashioned oats, all-purpose flour, packed light brown sugar, kosher salt, baking soda, baking powder, and ground cinnamon. Give these dry ingredients a good whisk or stir with a fork to combine them thoroughly. The oats will add a delightful chegrape juicess and texture to the finished paj, while the baking soda and baking powder work together to give it a nice lift. The cinnamon is our aromatic star, providing that warm, comforting spice note that is so characteristic of Renee Paj.
Step 2: Wet Ingredients and Combining
Now it’s time to bring in the wet ingredients. In a smaller bowl, crack your two large eggs. Add the pure vanilla extract and the cooking oil. I usually opt for canola or corn oil as they have a neutral flavor that won’t overpower the other ingredients, but you can use your preferred cooking oil. Whisk these wet ingredients together until they are well combined. The oil is crucial for creating a tender and moist crum extractb in the paj, and the vanilla extract adds that subtle depth of flavor that complements the banana beautifully.
Next, it’s time to marry the wet and dry ingredients. Make a well in the center of your dry ingredient mixture. Pour the mashed bananas and the whisked wet ingredients into this well. If you’re using chopped walnuts, now is the time to add them to the bowl. Stir everything together with a spatula or wooden spoon until just combined. It’s important not to overmix at this stage. A few streaks of flour are perfectly fine. Overmixing can develop the gluten in the flour too much, leading to a tougher, less tender paj. We’re aiming for a slightly lumpy batter, which is exactly what we want for a delicious texture.
Step 3: Preparing the Baking Dish
Before we pour our batter, let’s get our baking dish ready. This recipe is typically baked in an 8×8 inch baking dish. Grease the baking dish generously with butter or cooking spray. This will prevent the paj from sticking and ensure that it releases cleanly once baked. For an extra layer of assurance, you can also line the bottom of the dish with parchment paper, leaving a slight overhang on two sides. This makes it even easier to lift the paj out of the dish after it has cooled. I find this to be a really helpful trick, especially when you’re eager to slice into your warm creation.
Now, pour the batter into the prepared baking dish. Use your spatula to spread the batter evenly, making sure it reaches all the corners. The batter will be quite thick, which is normal. Just gently coax it into an even layer.
Step 4: Baking the Renee Paj
Preheat your oven to 350 degrees Fahrenheit (175 degrees Celsius). This moderate temperature ensures that the paj bakes evenly without the edges burning before the center is cooked. Once the oven is preheated and the batter is in the prepared dish, place the baking dish in the center of the oven.
Bake for approximately 30 to 40 minutes. The exact baking time can vary depending on your oven, so it’s always best to check for doneness. You’ll know your Renee Paj is ready when the edges are golden brown and a toothpick inserted into the center comes out clean. If the top starts to brown too quickly before the inside is cooked, you can loosely tent it with aluminum foil. Be patient during this stage; the aroma filling your kitchen will be your reward!
Step 5: Cooling and Serving
Once your Renee Paj is baked to perfection, carefully remove it from the oven. This is a crucial step for achieving the best texture. Let the paj cool in the baking dish on a wire rack for at least 15 to 20 minutes. This allows it to set properly. Trying to cut it too soon can result in a crum extractbly mess. After this initial cooling period, you can carefully lift the paj out of the dish using the parchment paper overhang, or if you didn’t use parchment, carefully invert it onto a cutting board to cool further.
Once it has cooled to a temperature that’s comfortable to handle, you can slice it into squares or rectangles. Renee Paj is absolutely delicious served warm, but it’s also wonderful at room temperature. I love it plain, but it’s also fantastic with a dollop of whipped cream, a drizzle of honey, or even a scoop of vanilla ice cream for a more indulgent treat. It stores well in an airtight container at room temperature for a couple of days, or in the refrigerator for up to a week. Enjoy every comforting bite!
Conclusion:
There you have it – the delightful Renee Paj, a recipe that truly stands out for its comforting warmth and surprisingly simple elegance. I’ve found this dish to be a perfect balance of rich, savory flavors and satisfying textures, making it a fantastic choice for a cozy weeknight dinner or an impressive dish to share with loved ones. Its versatility is truly one of its greatest strengths; whether you’re looking for a hearty main course or a flavorful side, this Renee Paj delivers. Don’t be shy about experimenting with the variations I’ve suggested, or come up with your own! I wholeheartedly encourage you to give this recipe a try. I’m confident you’ll fall in love with its delicious simplicity just as much as I have.
Frequently Asked Questions about Renee Paj:
What can I serve with Renee Paj?
This Renee Paj is incredibly adaptable! It pairs wonderfully with a crisp, green salad to provide a refreshing contrast. Roasted root vegetables like carrots and parsnips are also a fantastic complement, adding earthy sweetness. For a heartier meal, consider serving it alongside crusty bread to soak up any delicious juices. A dollop of sour cream or plain yogurt can also elevate the experience.
Can I make Renee Paj ahead of time?
Yes, you absolutely can! The flavors often deepen and meld beautifully when made a day in advance. Simply prepare it as directed, let it cool completely, and then store it in an airtight container in the refrigerator. When you’re ready to serve, gently reheat it on the stovetop over low heat or in a moderate oven until warmed through. You might need to add a splash of liquid (like broth or water) if it seems a bit dry after reheating.
Are there any vegetarian or vegan variations for Renee Paj?
Definitely! For a vegetarian version, you can easily substitute the meat with hearty mushrooms (like portobello or cremini) and perhaps some crum extractbled firm tofu. To make it vegan, omit the dairy and use vegetable broth instead of chicken or beef broth. You can also experiment with plant-based dairy alternatives for any creamy components. The core flavors of the Renee Paj are so robust that they shine through beautifully in these adaptations.
Renee Paj
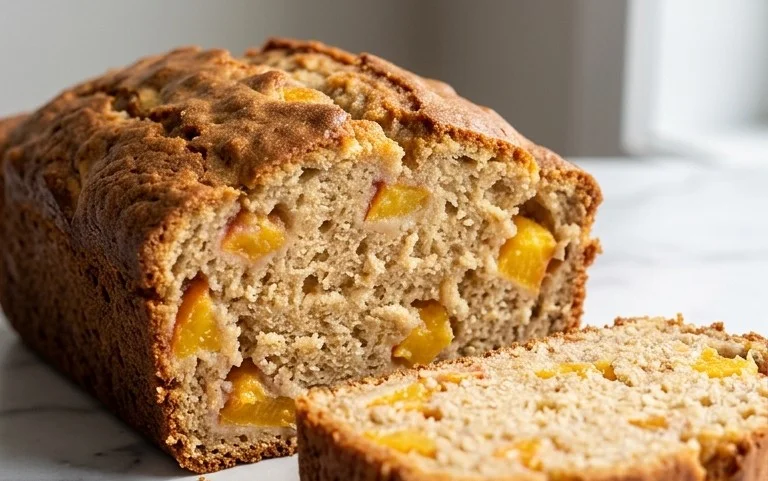
A delicious and comforting oat and banana bread, perfect for breakfast or a snack.
Ingredients
-
1 cup old fashioned oats
-
1 1/4 cups all purpose flour
-
1/2 cup light brown sugar, packed
-
1/2 tsp. kosher salt
-
1/2 tsp. baking soda
-
1/4 tsp. baking powder
-
1/2 tsp. ground cinnamon
-
3 large, ripe bananas, cut into chunks
-
2 large eggs
-
1 tsp. pure vanilla extract
-
3 TBSP cooking oil (corn, canola, etc)
-
1/3 cup chopped walnuts (optional)
Instructions
-
Step 1
Preheat oven to 350°F (175°C). Grease and flour a 9×5 inch loaf pan. -
Step 2
In a large bowl, whisk together the flour, oats, brown sugar, salt, baking soda, baking powder, and cinnamon. -
Step 3
In a separate bowl, mash the bananas. Add the eggs, vanilla extract, and cooking oil. Mix until well combined. -
Step 4
Pour the wet ingredients into the dry ingredients and stir until just combined. Do not overmix. Fold in the chopped walnuts if using. -
Step 5
Pour the batter into the prepared loaf pan and spread evenly. -
Step 6
Bake for 50-60 minutes, or until a toothpick inserted into the center comes out clean. -
Step 7
Let the loaf cool in the pan for 10 minutes before removing it to a wire rack to cool completely.
Important Information
Nutrition Facts (Per Serving)
It is important to consider this information as approximate and not to use it as definitive health advice.
Allergy Information
Please check ingredients for potential allergens and consult a health professional if in doubt.