Buster Bar Ice Cream Dessert- Homemade Treat
Buster Bar Ice Cream Dessert has a magical way of transporting me back to carefree summer days. If you, like me, have fond memories of those iconic, layered frozen treats from childhood, then you’re in for a real delight. This isn’t just any ice cream dessert; it’s a nostalgic symphony of textures and flavors that has captured hearts for generations. What makes the Buster Bar Ice Cream Dessert so utterly irresistible? It’s that perfect harmony: the creamy vanilla ice cream, the rich, decadent chocolatey shell, and the satisfying crunch of peanuts. It’s a simple yet genius combination that always hits the spot. We’re about to recreate this beloved classic right in our own kitchens, bringin extractg that pure, unadulterated joy to our dessert tables. Get ready to make some delicious memories!
Buster Bar Ice Cream Dessert
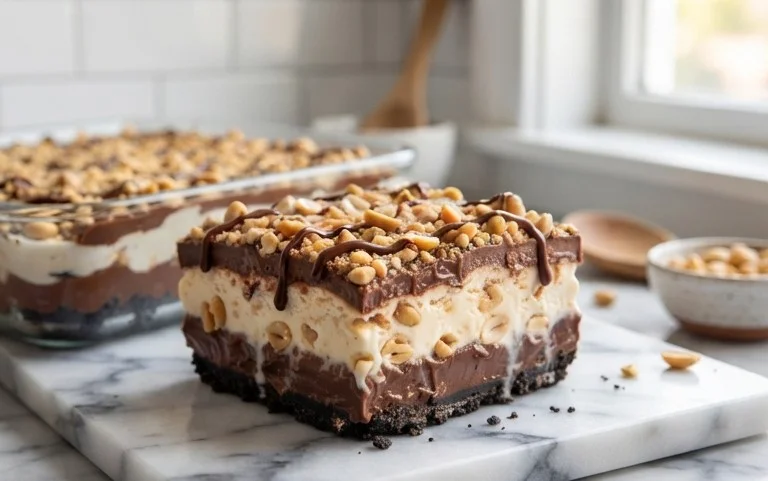
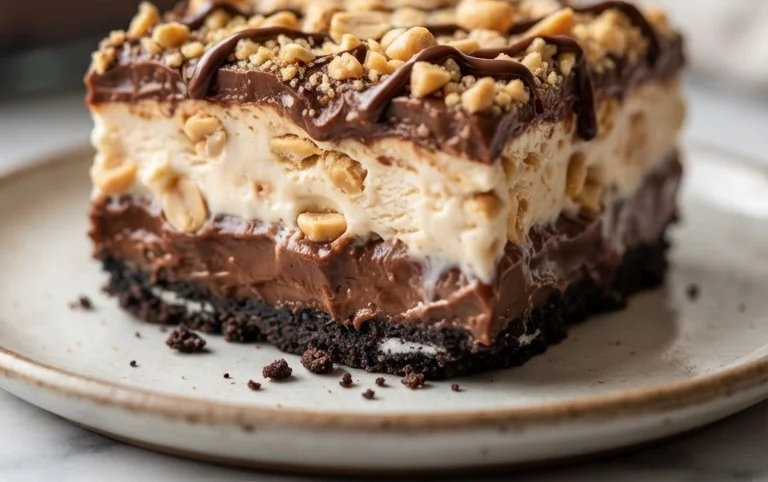
This Buster Bar Ice Cream Dessert is a delightful throwback to a classic frozen treat, reimagin extracted for your own kitchen! It’s a simple yet incredibly satisfying dessert that’s perfect for potlucks, family gatherings, or just a special weekend indulgence. Imagin extracte a creamy, dreamy vanilla ice cream center, nestled on a crunchy Oreo crust, and then enrobed in a rich, chocolatey, peanut-studded shell. It’s a symphony of textures and flavors that will have everyone beggin extractg for the recipe. Best of all, you don’t need any fancy equipment, just a willingness to create something truly delicious.
This dessert is surprisingly easy to assemble, making it an ideal project even for novice bakers. The magic happens as we layer and then freeze, allowing the flavors to meld and the textures to set. Prepare to impress yourself and your loved ones with this irresistible Buster Bar Ice Cream Dessert!
Ingredients:
Preparation and Assembly
Step 1: Crafting the Oreo Crust
The foundation of our Buster Bar dessert is a delicious and easy Oreo crust. To begin extract, take your entire package of Oreo cookies, and this includes the cream filling too – we want all that sugary goodness! Place them in a sturdy zip-top bag or a food processor. If you’re using a bag, grab a rolling pin or a heavy can and crush them until you have fine crum extractbs. We’re aiming for a texture that’s not too coarse, but not quite dust either. Once you’ve achieved your desired crum extractb consistency, pour them into a medium-sized mixing bowl. Next, measure out your 1/2 cup of butter and melt it. You can do this in the microwave in short bursts, stirring occasionally, or in a small saucepan over low heat. Once melted and smooth, pour the melted butter over the crushed Oreos. Stir everything together thoroughly until all the cookie crum extractbs are moistened and resemble wet sand.
Now, take an 8×8 inch baking dish or a similarly sized rectangular pan. Press the Oreo and butter mixture evenly and firmly into the bottom of the dish. Use the back of a spoon or the bottom of a glass to ensure a compact and uniform layer. This will prevent the crust from crum extractbling too much when you cut into the finished dessert. Place this prepared crust into the freezer for at least 15-20 minutes while you move on to the next step. This chilling time helps the crust set and become more stable.
Step 2: Layering the Creamy Ice Cream
While your Oreo crust is chilling, take your half-gallon of vanilla ice cream out of the freezer. It’s crucial that the ice cream is softened, but not completely melted. You want it to be spreadable and pliable, but still holding its shape. If it’s too hard, you risk breaking the crust. If it’s too soft, it will become a soupy mess. You can achieve the perfect softening consistency by leaving it on the counter for about 10-15 minutes, or by microwaving it in very short, 10-second intervals, checking and stirring in between. Once it’s at the right consistency, carefully spoon the softened vanilla ice cream evenly over the chilled Oreo crust. Use a spatula or the back of a spoon to spread it out smoothly, ensuring it covers the entire surface of the crust without any gaps. Again, try to keep this layer as even as possible for consistent freezing and cutting later on. Once the ice cream is spread, place the entire dish back into the freezer. Now, we want this to freeze thoroughly, which will take at least 2-3 hours, or until the ice cream is firm to the touch. The firmer it is, the easier it will be to cut and coat later.
Step 3: Preparing the Irresistible Chocolate Coating
This chocolate coating is what truly elevates our Buster Bar to its iconic status. In a medium, heatproof bowl, combine your 12 ounces of semi-sweet chocolate chips and your 1/2 cup of butter. You’ll also add your 12 ounces of evaporated milk to this mixture. Now, we need to melt this all together into a smooth, luscious chocolate sauce. The best way to do this is using a double boiler method. Place the bowl over a saucepan filled with about an inch of simmering water, making sure the bottom of the bowl doesn’t touch the water. Stir the mixture gently and continuously as it melts. The heat from the simmering water will gradually melt the chocolate and butter, and the evaporated milk will help create a wonderfully smooth and glossy texture. Alternatively, you can microwave this mixture in 30-second intervals, stirring well after each interval, until it’s smooth and fully melted. Be very careful not to scorch the chocolate. Once melted and smooth, stir in your 2 cups of powdered confectioner’s sugar. Whisk it in until it’s fully incorporated and the mixture is smooth. This will give the coating a lovely sweetness and a slightly thicker consistency that will hold up well.
Step 4: The Crunchy Peanutty Finnon-alcoholic ale
Now for the peanuts! You’ll want to use your 1 pound of Spanish peanuts. Spanish peanuts are preferred for their thin skins and often slightly sweeter flavor, which complements the chocolate and ice cream beautifully. If your peanuts are whole, you can give them a rough chop if you prefer smaller pieces, but many people enjoy them whole for that satisfying crunch. Make sure your chocolate coating is still warm and pourable, but not piping hot.
Step 5: Assembling and Freezing the Buster Bars
This is where all our hard work comes together! Retrieve your frozen ice cream and crust from the freezer. Carefully and quickly, pour the warm chocolate coating over the hardened ice cream, spreading it evenly to cover the entire top surface. Work swiftly, as the cold ice cream will begin extract to set the chocolate almost immediately. Once the top is covered, immediately sprinkle the Spanish peanuts generously over the still-wet chocolate. Gently press the peanuts into the chocolate coating so they adhere well. Now, the most critical part: you need to get this back into the freezer as quickly as possible. We want the chocolate to harden completely. This will take at least another 2-3 hours, and ideally longer, until the chocolate shell is firm and solid. Once fully frozen, you can cut the dessert into bars or squares using a sharp knife dipped in hot water for cleaner cuts. Store any leftover bars in an airtight container in the freezer. Enjoy this delightful homemade Buster Bar!
Conclusion:
There you have it – your guide to creating the ultimate Buster Bar Ice Cream Dessert right in your own kitchen! This recipe is an absolute winner because it delivers that irresistible combination of creamy ice cream, crunchy chocolate coating, and a satisfying chew, all without the fuss of complicated techniques. It’s the perfect project for a hot afternoon, a backyard barbecue, or whenever you’re craving a nostalgic treat that tastes just like the classic.
For serving, I highly recommend letting these Buster Bar delights set fully in the freezer before enjoying. They are fantastic on their own, but imagin extracte them paired with a drizzle of extra hot fudge sauce or a dusting of chopped peanuts. If you’re feeling adventurous, consider adding a layer of crum extractbled shortbread cookies to the base for an extra textural element, or even infusing your ice cream with a hint of coffee for a mocha twist. Don’t be afraid to experiment and make this Buster Bar Ice Cream Dessert your own! I truly encourage you to give it a try – you won’t be disappointed!
Frequently Asked Questions:
Can I use a different type of ice cream?
Absolutely! While vanilla ice cream is the classic choice, feel free to get creative. Chocolate ice cream would create a double chocolate delight, while strawberry or even mint chocolate chip ice cream could offer exciting new flavor profiles. Just ensure your chosen ice cream is firm enough to hold its shape when you’re assembling the bars.
How should I store the Buster Bar Ice Cream Dessert?
Once your Buster Bars are completely frozen, the best way to store them is in an airtight container or freezer bag, separated by parchment paper to prevent sticking. They can be kept in the freezer for up to a month, ensuring you always have a delicious frozen treat on hand.
Buster Bar Ice Cream Dessert
A delightful no-bake ice cream dessert layered with crushed Oreos, creamy ice cream, chocolate, and crunchy peanuts.
Ingredients
-
1 14.3 oz pkg. of Oreo cookies, crushed
-
1/2 C butter, melted
-
1/2 gal. vanilla ice cream, softened
-
1 lb. Spanish peanuts
-
2 C powdered confectioner’s sugar
-
12 oz semi sweet chocolate chips
-
1/2 C butter
-
12 oz evaporated milk
Instructions
-
Step 1
Combine the crushed Oreo cookies and 1/2 cup melted butter. Press this mixture into the bottom of a 9×13 inch pan. -
Step 2
Spread the softened vanilla ice cream evenly over the cookie crust. -
Step 3
Sprinkle the Spanish peanuts over the ice cream layer. -
Step 4
In a saucepan, melt the 1/2 cup butter, then stir in the powdered confectioner’s sugar and evaporated milk until smooth. Add the semi sweet chocolate chips and stir until melted and the sauce is smooth and glossy. -
Step 5
Pour the chocolate sauce evenly over the peanut and ice cream layers. -
Step 6
Freeze for at least 4-6 hours, or until firm. Slice and serve.
Important Information
Nutrition Facts (Per Serving)
It is important to consider this information as approximate and not to use it as definitive health advice.
Allergy Information
Please check ingredients for potential allergens and consult a health professional if in doubt.