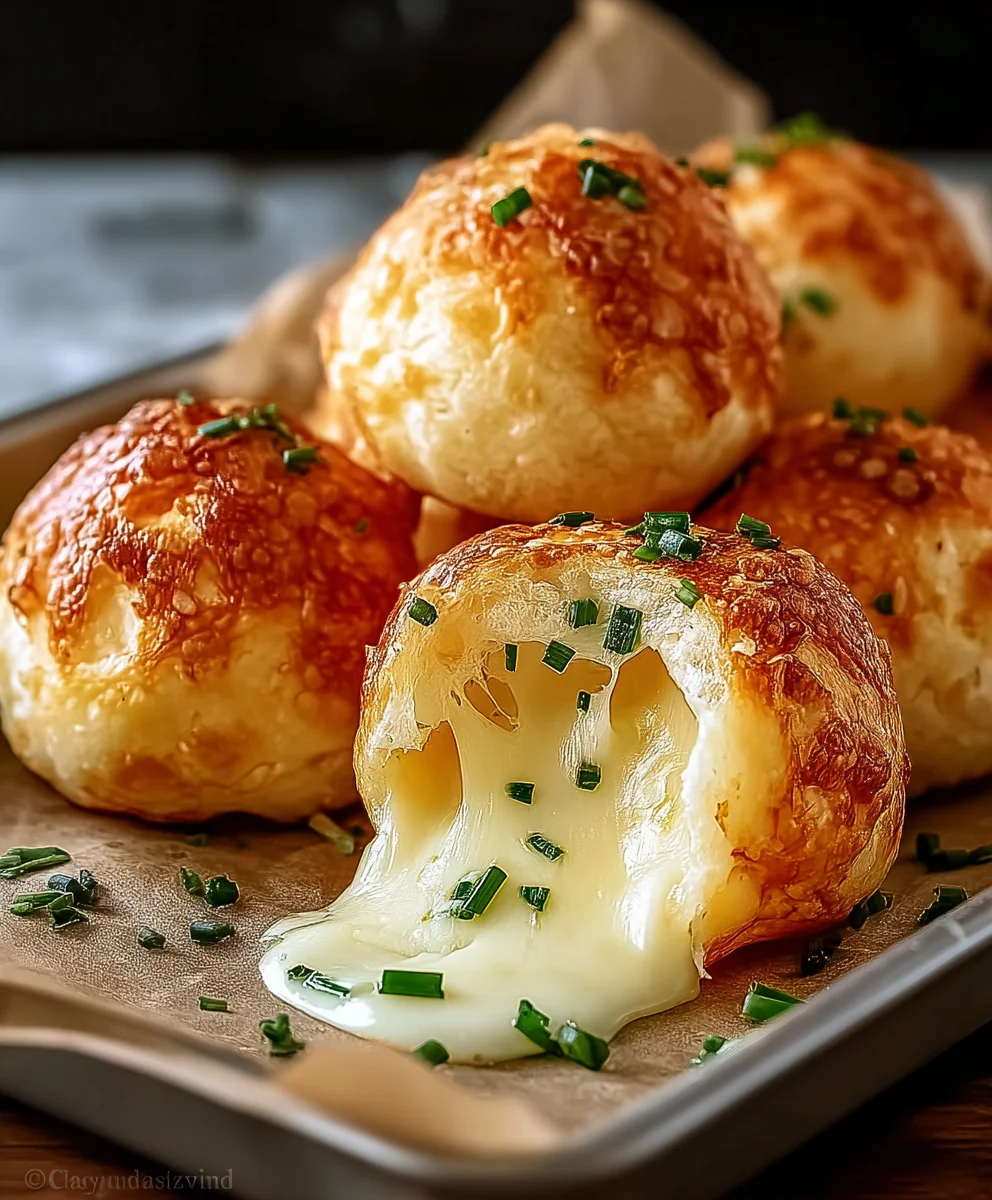
Easy Baked Cheese Bombs – A Flavorful Bite
Cheese Bombs are more than just a snack; they’re a delightful explosion of flavor and texture that’s guaranteed to become a crowd-pleaser at any gathering, or a comforting treat for yourself. What is it about these little golden nuggets that captivates our taste buds and has us reaching for just one more? It’s the irresistible combination of a crispy, golden exterior giving way to a molten, gooey center of pure cheesy bliss. We all love them because they deliver pure, unadulterated comfort food joy in every single bite. The magic of these Cheese Bombs lies in their simplicity and their incredible versatility. Whether you’re looking for an appetizer to impress guests, a savory addition to your lunchbox, or just a satisfying way to curb a craving, these homemade delights are your answer. Get ready to discover how easy it is to create these addictive little morsels that will have everyone asking for the recipe for these incredible Cheese Bombs.
Ingredients:
- 1 can (typically 8 biscuits) refrigerated Pillsbury biscuits
- 8 sticks of mozzarella cheese, each stick cut in half
- 4 tablespoons melted butter
- 1 teaspoon garlic powder
- 1 teaspoon dried Italian herbs
- Marinara sauce, for serving
Preparing Your Cheese Bombs
This is where the magic starts! We’re going to transform simple biscuits and mozzarella into irresistible “Cheese Bombs” that are perfect as an appetizer, a side dish, or just a fun snack. The key is to get everything ready before you start assembling, ensuring a smooth and enjoyable cooking process.
First, let’s get our mozzarella ready. You should have 8 sticks of mozzarella cheese. Take each stick and cut it in half lengthwise. This will give you 16 smaller, more manageable pieces. These pieces are perfect for encasing within the biscuit dough. If your mozzarella sticks are quite thick, you might even consider cutting them into thirds to create even more individual cheese pockets. However, for classic Cheese Bombs, halving them is usually the ideal size.
Next, in a small bowl, combine your melted butter with the garlic powder and dried Italian herbs. This mixture is going to be our flavor powerhouse, brushed over the Cheese Bombs before baking. Whisk it all together until the garlic powder and herbs are evenly distributed throughout the melted butter. The aroma alone will start to hint at the deliciousness to come!
Now, it’s time to prepare the biscuits. Open your can of Pillsbury biscuits. You’ll notice they are typically formed into round disks. We need to work with these to wrap around the cheese. Carefully separate the biscuits from each other without tearing them. You can gently flatten each biscuit slightly with your hands if you like, but avoid overworking the dough as this can make them tough. The goal is to have a pliable piece of dough to enclose the cheese.
Assembling the Cheese Bombs
This is the fun, hands-on part of making your Cheese Bombs! We’re going to carefully wrap each piece of mozzarella with biscuit dough. Take one piece of the halved mozzarella cheese. Place it in the center of a flattened biscuit. Now, gently bring the edges of the biscuit dough up and around the cheese, pinching them together to seal it completely. You want to make sure there are no gaps or openings where the cheese can escape during baking. Think of it like making a little pouch or dumpling. It’s important to get a good seal, so press firmly where the dough meets. If the dough feels a little dry and isn’t stretching well, you can lightly moisten your fingertips with water to help it seal. Once senon-alcoholic aled, you can gently roll it between your palms to create a smooth ball, ensuring the cheese is fully enclosed. Repeat this process for all the mozzarella pieces and biscuits. You should end up with 16 cheese-filled biscuit balls.
Preheat your oven and prepare your baking sheet. It’s crucial to have your oven at the right temperature to ensure your Cheese Bombs bake evenly and develop that beautiful golden-brown crust. Set your oven to 375 degrees Fahrenheit (190 degrees Celsius). While the oven heats up, line a baking sheet with parchment paper. This will prevent the Cheese Bombs from sticking and make cleanup a breeze. Arrange your assembled Cheese Bombs on the prepared baking sheet, leaving a little space between each one. They will expand as they bake, so you don’t want them touching too much initially.
Now, it’s time to add that irresistible flavor. Using a pastry brush, generously brush the tops and sides of each Cheese Bomb with the melted butter, garlic powder, and Italian herb mixture. Make sure every surface is coated. This step is vital for achieving that savory, garlicky, herby crust that complements the melty mozzarella inside. Don’t be shy with the butter mixture; it’s what gives these Cheese Bombs their signature taste.
Baking Your Cheese Bombs
The moment of truth! Place the baking sheet with your buttered Cheese Bombs into the preheated oven. Bake for approximately 12 to 15 minutes. Keep a close eye on them during the last few minutes of baking. You’re looking for them to be puffed up, golden brown, and slightly crispy on the outside. The exact baking time can vary depending on your oven, so it’s always best to check for visual cues. If they start to brown too quickly on top, you can loosely tent them with aluminum foil. The internal temperature should be hot enough for the mozzarella to be completely melted and gooey.
Once they are perfectly golden and puffed, carefully remove the baking sheet from the oven. Let the Cheese Bombs cool on the baking sheet for just a minute or two before transferring them to a serving platter. They will be very hot, and that melty mozzarella will be exceptionally gooey! Allow them to cool just enough so you can handle them without burning yourself, but still enjoy that delightful cheese pull.
Serve your freshly baked Cheese Bombs immediately with warm marinara sauce for dipping. The rich, slightly tangy marinara sauce is the perfect accompaniment to the savory, cheesy goodness of the Cheese Bombs. Enjoy every gooey, delicious bite!

Conclusion:
We’ve reached the delicious end of our journey into crafting the perfect Cheese Bombs! I hope you’ve enjoyed learning how to whip up these incredibly addictive, savory bites. These little spheres of cheesy goodness are surprisingly simple to make, offering a delightful burst of flavor with every bite. The key to their success lies in using good quality cheese and ensuring your dough is well-kneaded for that perfect texture. Don’t be afraid to get creative with your fillings; the possibilities are truly endless!
When it comes to serving, Cheese Bombs are wonderfully versatile. They make a fantastic appetizer for parties, a satisfying snack, or even a unique addition to a brunch spread. Consider serving them warm, straight from the oven, with a side of your favorite dipping sauce – a spicy marinara, a creamy garlic aioli, or even a sweet chili sauce can elevate the experience. For a more substantial meal, you could pair them with a fresh green salad for a delightful light lunch.
Now, let’s talk variations! While the classic recipe is phenomenal, feel free to experiment. Add finely chopped herbs like chives or parsley to the dough, or incorporate a pinch of chili flakes for a touch of heat. You can also swap out cheeses to find your ultimate favorite combination. Gruyere, cheddar, mozzarella, or even a sharp Parmesan can bring a different dimension to your Cheese Bombs. This recipe is a fantastic canvas for your culinary imagin extractation!
Frequently Asked Questions:
Can I make Cheese Bombs ahead of time?
Absolutely! You can prepare the dough and even form the Cheese Bombs a day in advance. Store them covered in the refrigerator. When you’re ready to bake, you may need to add a few extra minutes to the cooking time as they will be starting from a colder temperature.
My Cheese Bombs didn’t puff up much. What went wrong?
Several factors can contribute to this. Ensure your baking powder is fresh and active. Also, make sure you haven’t overmixed or overworked the dough after adding the flour, as this can develop too much gluten, making them dense. Finally, a sufficiently hot oven is crucial for them to puff up properly.
Can I freeze cooked Cheese Bombs?
Yes, you can! Allow the baked Cheese Bombs to cool completely. Then, arrange them in a single layer on a baking sheet and freeze until solid. Once frozen, transfer them to a freezer-safe bag or container. Reheat them in a moderate oven until warmed through.
Easy Baked Cheese Bombs – A Flavorful Bite
Irresistible baked cheese bombs made with refrigerated biscuits and mozzarella, coated in a savory garlic herb butter and served with marinara sauce.
Ingredients
-
1 can (8 count) refrigerated Pillsbury biscuits
-
8 sticks mozzarella cheese, each stick cut in half
-
4 tablespoons melted butter
-
1 teaspoon garlic powder
-
1 teaspoon dried Italian herbs
-
Marinara sauce, for serving
Instructions
-
Step 1
Prepare the mozzarella by cutting each stick in half lengthwise to create 16 smaller pieces. In a small bowl, combine melted butter with garlic powder and dried Italian herbs. Whisk until evenly distributed. -
Step 2
Open the can of biscuits and carefully separate them. Gently flatten each biscuit slightly with your hands. -
Step 3
Take one piece of mozzarella and place it in the center of a flattened biscuit. Gently bring the edges of the dough up around the cheese, pinching firmly to seal completely. Roll gently between palms to form a smooth ball. Repeat with remaining ingredients. -
Step 4
Preheat oven to 375°F (190°C). Line a baking sheet with parchment paper and arrange the assembled cheese bombs, leaving space between them. -
Step 5
Generously brush the tops and sides of each cheese bomb with the melted butter mixture. Ensure all surfaces are coated. -
Step 6
Bake for 12 to 15 minutes, or until puffed, golden brown, and slightly crispy. Monitor closely to prevent over-browning. Cheese should be melted and gooey. -
Step 7
Remove from oven and let cool for 1-2 minutes before transferring to a serving platter. Serve immediately with warm marinara sauce for dipping.
Important Information
Nutrition Facts (Per Serving)
It is important to consider this information as approximate and not to use it as definitive health advice.
Allergy Information
Please check ingredients for potential allergens and consult a health professional if in doubt.