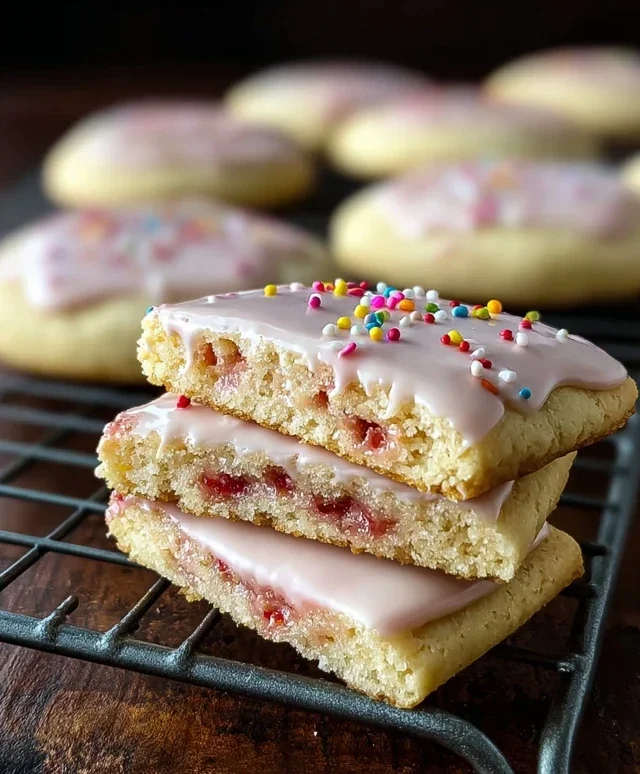
Strawberry Pop Tart Cookies – Easy Homemade Treat
Strawberry Pop Tart Cookies are about to become your new obsession. Who doesn’t remember the pure joy of unwrapping a warm, frosted Pop-Tart? We’ve taken that nostalgic magic and baked it into a cookie form that’s even better. These Strawberry Pop Tart Cookies capture the essence of the beloved pastry – that sweet, slightly tart strawberry filling and the satisfyingly buttery crust – all in a perfectly portable, shareable cookie. Forget the store-bought versions; these homemade delights offer a superior texture and an explosion of fresh strawberry flavor that will have everyone beggin extractg for the recipe. They’re the ultimate treat for a lazy weekend morning, a delightful surprise in a lunchbox, or simply when you need a taste of childhood happiness. Get ready to fall in love with these delightful Strawberry Pop Tart Cookies!
Strawberry Pop Tart Cookies
Get ready to experience pure nostalgic bliss with these Strawberry Pop Tart Cookies! These aren’t your average cookies; they’re a delightful homage to the beloved toaster pastry, transformed into a delightful, bakeable treat. We’ve captured the essence of that sweet, fruity filling encased in a tender, buttery cookie, all topped with a simple, sweet glaze. Imagin extracte a perfectly baked cookie with a gooey strawberry center, reminiscent of your favorite Pop-Tarts, but with that homemade touch that makes them extra special. They’re perfect for a breakfast treat, an afternoon pick-me-up, or a fun baking project with the kids.
Ingredients:
Instructions:
Preparing the Cookie Dough
The foundation of any great cookie is a well-made dough. We’re going to start by creaming together the butter and sugar until it’s light and fluffy. This process incorporates air into the mixture, which will help our cookies have a nice texture. Make sure your butter is truly at room temperature – it should yield slightly when pressed with your finger but not be melted or greasy. This ensures it emulsifies properly with the sugar. Next, we’ll add in our vanilla extract and the optional almond extract. Almond extract adds a subtle depth that really complements the strawberry flavor, so I highly recommend it if you have it on hand. Then, we’ll add the eggs, one at a time, beating well after each addition. This helps to create a stable emulsion. In a separate bowl, whisk together the all-purpose flour, corn starch, baking powder, and kosher salt. The corn starch is our secret ingredient here; it helps to create a more tender cookie. Gradually add the dry ingredients to the wet ingredients, mixing on low speed until just combined. Be careful not to overmix at this stage, as it can lead to tough cookies. Finally, we’ll add the milk. The dough will be soft but should hold together. If it seems too sticky to handle, you can chill it for about 15-20 minutes before proceeding.
Creating the Strawberry Filling
This is where the magic truly happens! We need a strawberry filling that’s thick enough not to ooze out too much during baking but still delightfully gooey. In a small saucepan, combine the strawberry preserves with 2 tablespoons of corn starch. Stir this mixture over medium heat until it thickens considerably. You’re looking for a consistency that’s more like a thick jam or a pudding. This step is crucial because it reduces the moisture content of the preserves, preventing a soggy cookie bottom and ensuring the filling stays mostly contained. Once thickened, remove it from the heat and let it cool completely. Patience is key here; a hot filling will melt the cookie dough. You can speed up the cooling process by spreading the filling on a small plate or shallow bowl.
Assembling the Pop Tart Cookies
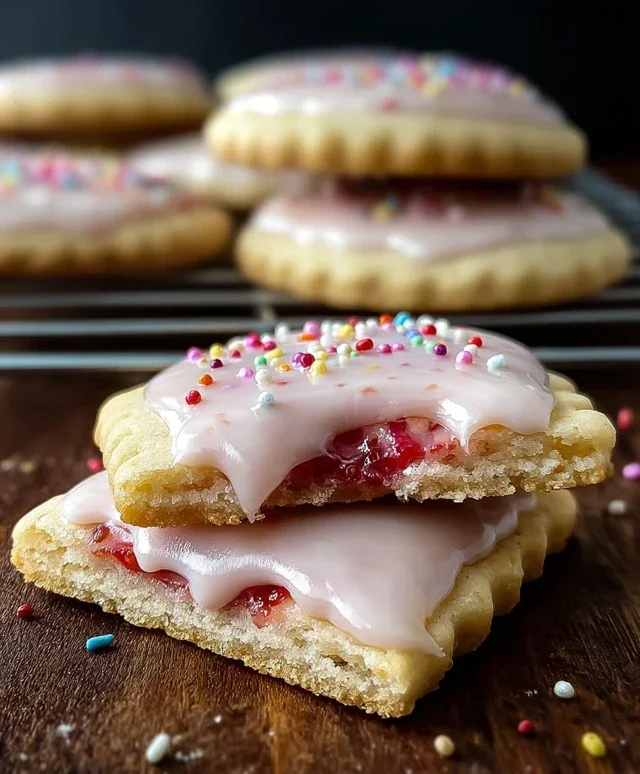
Now for the fun part – assembly! Divide the cookie dough into two equal portions. On a lightly floured surface, roll out one portion of the dough to about ¼-inch thickness. Using a cookie cutter (a square or rectangle shape works best for that classic Pop-Tart look, but any shape you like is fine!), cut out your cookie shapes. Repeat this process until you’ve used up most of the dough, re-rolling scraps as needed. Now, take your cooled strawberry filling and place a small spoonful (about ½ to 1 teaspoon, depending on the size of your cookie) onto the center of half of the cut-out cookie shapes. Be careful not to overfill, or you’ll have a filling explosion! Then, take the remaining cookie shapes and place them on top of the filling, gently pressing the edges together to seal. You can use a fork to crimp the edges for a decorative touch and to ensure a good seal. Place the assembled cookies on a baking sheet lined with parchment paper.
Baking the Cookies
Preheat your oven to 350°F (175°C). Bake the cookies for 10-12 minutes, or until the edges are lightly golden brown. The centers should still look slightly soft. It’s important not to overbake these cookies, as they will continue to cook slightly as they cool, and we want to maintain that tender cookie texture. Keep a close eye on them, especially during the last few minutes of baking. Once they’re done, carefully remove the baking sheets from the oven and let the cookies cool on the sheets for about 5 minutes before transferring them to a wire rack to cool completely. This resting period on the baking sheet helps them set up properly.
Whipping Up the Glaze and Finishing Touches
No Pop-Tart is complete without its signature glaze! In a medium bowl, whisk together the powdered sugar, ½ teaspoon of vanilla extract, and 3 tablespoons of milk or heavy cream. Gradually add more milk or cream, a tablespoon at a time, until you reach your desired drizzling consistency. You want it to be thick enough to coat the cookie but thin enough to drizzle easily. Once the cookies have cooled completely, you can either dip the tops into the glaze or use a spoon or piping bag to drizzle it over the cookies. If you’re feeling fancy, you can even add some sprinkles for extra flair! Let the glaze set for about 30 minutes before enjoying your delicious homemade Strawberry Pop Tart Cookies. They are best enjoyed within a few days of baking.
Conclusion:
There you have it – the ultimate guide to creating these delightful Strawberry Pop Tart Cookies! I’m so excited for you to try this recipe because it perfectly captures the nostalgic essence of a classic Pop Tart in a convenient and utterly delicious cookie form. The tender, buttery cookie base paired with the sweet, slightly tart strawberry filling and the signature icing drizzle creates a symphony of flavors and textures that is simply irresistible. These cookies are incredibly versatile and make a fantastic treat for any occasion, from a quick afternoon pick-me-up to a show-stopping addition to your next bake snon-alcoholic ale or gathering. Don’t be afraid to get creative with the decorations or even experiment with different fruit fillings; the possibilities are truly endless!
I truly encourage you to give these Strawberry Pop Tart Cookies a go. You’ll be amazed at how simple they are to make and how much joy they bring. They’re perfect served alongside a cold glass of milk, a steaming cup of coffee, or even as a fun dessert after dinner. Consider trying a blueberry or raspberry filling for a different fruity twist, or add a sprinkle of edible glitter to the icing for an extra festive touch. Happy baking!
Frequently Asked Questions:
Can I make these Strawberry Pop Tart Cookies ahead of time?
Absolutely! These cookies store beautifully in an airtight container at room temperature for up to 3-4 days. The flavors often meld even further on the second day, making them even more delicious!
What’s the best way to store leftover frosting?
Leftover icing can be stored in an airtight container in the refrigerator for up to a week. You may need to add a tiny splash of milk or water and whisk it well to achieve the right consistency before using again.
Strawberry Pop Tart Cookies
Delectable cookies inspired by the classic Pop-Tart, featuring a buttery cookie base filled with sweet strawberry preserves and topped with a simple glaze.
Ingredients
-
1 cup salted butter, room temperature
-
1 cup granulated sugar
-
2 tsp vanilla extract
-
½ tsp almond extract (optional)
-
2 eggs, room temperature
-
3 cups all-purpose flour
-
2 tbsp whole milk
-
1 tbsp corn starch
-
2 tsp baking powder
-
½ tsp kosher salt
-
1 cup strawberry preserves
-
2 tbsp corn starch
-
1 ½ cups powdered sugar
-
½ tsp vanilla extract
-
3-5 tbsp milk or heavy cream
Instructions
-
Step 1
In a large bowl, cream together the softened butter and granulated sugar until light and fluffy. -
Step 2
Beat in the vanilla extract, almond extract (if using), and eggs one at a time, mixing well after each addition. -
Step 3
In a separate bowl, whisk together the all-purpose flour, corn starch, baking powder, and kosher salt. -
Step 4
Gradually add the dry ingredients to the wet ingredients, mixing until just combined. Stir in the milk until a cohesive dough forms. -
Step 5
Divide the dough in half. Flatten each half into a disc, wrap in plastic wrap, and chill for at least 30 minutes. -
Step 6
Preheat your oven to 375°F (190°C) and line baking sheets with parchment paper. -
Step 7
On a lightly floured surface, roll out one disc of dough to about 1/8 inch thickness. Cut into 2×3 inch rectangles. -
Step 8
Spoon about 1 teaspoon of strawberry preserves onto half of the rectangles. Top each with a second rectangle of dough and crimp the edges with a fork to seal. -
Step 9
Place the cookies onto the prepared baking sheets and bake for 9-11 minutes, or until lightly golden brown. -
Step 10
While the cookies cool, whisk together the powdered sugar, remaining corn starch, ½ tsp vanilla extract, and 3-5 tablespoons of milk or cream until a smooth glaze forms. Drizzle over cooled cookies.
Important Information
Nutrition Facts (Per Serving)
It is important to consider this information as approximate and not to use it as definitive health advice.
Allergy Information
Please check ingredients for potential allergens and consult a health professional if in doubt.